Files & photos
SSD NVMe on a Mac: Choosing an External Enclosure
If you're searching for ssd nvme, then you're likely looking at your options for storage, faster file transfer speeds, or an SSD that can be used with your Mac. But there are a few things to consider to avoid compatibility and performance problems when using one with a Mac. When using an NVMe SSD, you need to take all the relevant factors into consideration when choosing your external enclosure. These include SSD type, connection type, cable, Mac port and file system.
 Diskfern Team10 min readUpdated
Short answer
An M.2 NVMe SSD can be used externally with a Mac by using the correct external enclosure. In this article, we'll go over everything you need to know before purchasing, formatting your drive and making sure you're not paying extra for performance you won't get.
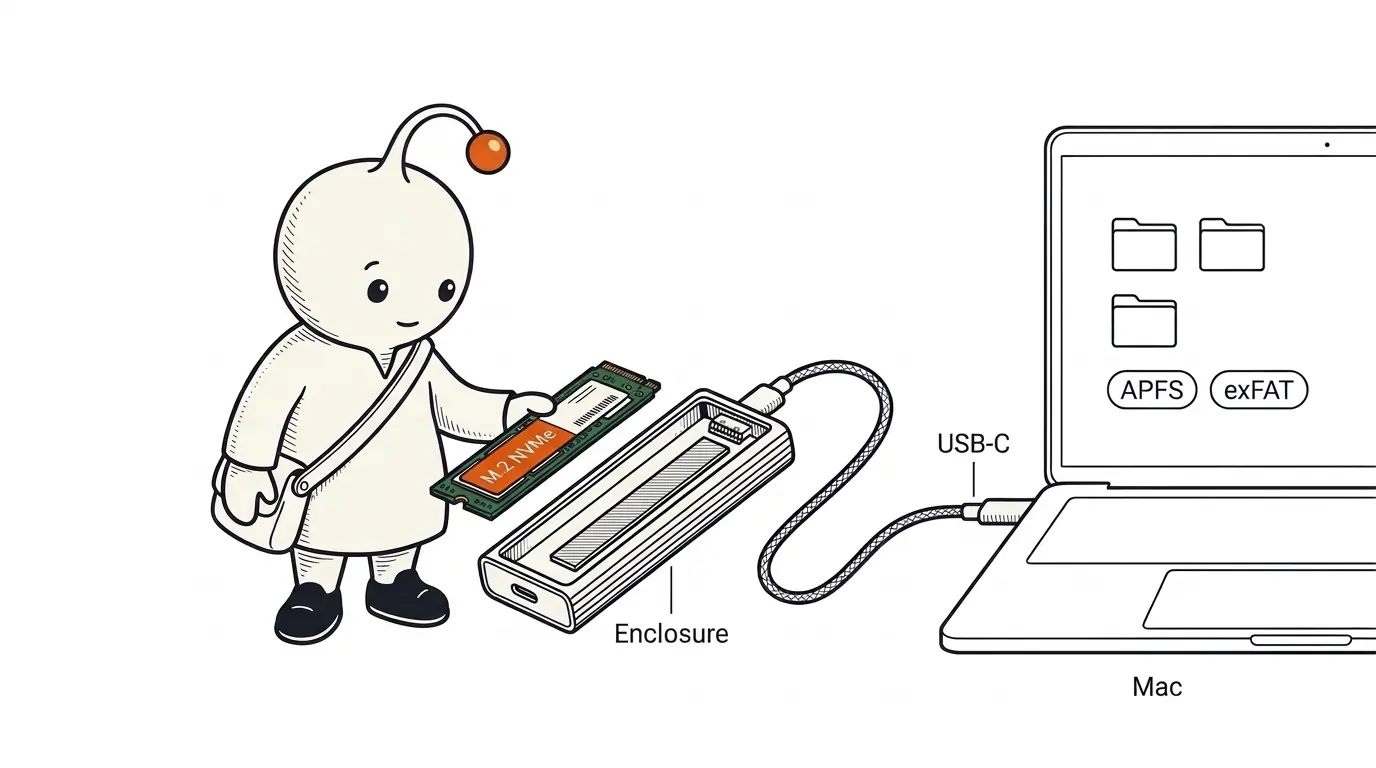
1. What's the difference between NVMe and M.2?
NVMe and M.2 are often used together, but they describe different things.
NVMe is a storage protocol designed for solid-state drives. It is commonly used with PCIe, taking advantage of its high bandwidth, low latency and ability to handle multiple data requests in parallel.
M.2 is a physical form factor that defines the size and connector arrangement of an SSD. Whilst some M.2 drives use the NVMe protocol over PCI Express (PCIe), others use SATA.
If you're looking at an M.2 NVMe external enclosure, ensure that your M.2 SSD isn't using SATA. Some external enclosures only support M.2 NVMe drives.
Seagate provides a useful breakdown of the different types of SSDs in its SSD types guide. Always check which protocol your SSD uses by looking at its specifications.
Here is a quick breakdown:
| Term | What it describes | What to check |
|---|---|---|
| NVMe | Storage protocol commonly used over PCIe | Whether the enclosure supports NVMe |
| SATA | Storage interface used by some SSDs | Whether the enclosure supports SATA |
| M.2 | Physical form factor and connector arrangement | Correct size and connector/key configuration |
| PCIe | High-speed interface commonly used by NVMe drives | Whether the SSD and enclosure support compatible PCIe specifications |
For your M.2 NVMe SSD, you'll need to use an external enclosure that specifically supports M.2 NVMe drives. Also, remember that the SSD's internal PCIe connection and the enclosure's external USB or Thunderbolt connection are two different parts of the setup.
2. Can I use an NVMe SSD with my Mac?
Yes! You'll be able to use your compatible M.2 NVMe SSD with your Mac by using an external enclosure with the correct connection type.
The setup looks like this:
M.2 NVMe SSD → Compatible external enclosure → USB-C cable → Compatible Mac port
Each component has a different job:
- SSD: Stores your files and contributes to the overall drive performance.
- External enclosure: Connects your internal NVMe drive to your Mac through an external interface.
- Cable: Needs to support the data-transfer speed required by the external enclosure.
- Mac port: Determines which connection types and speeds are available.
- File system: Determines how data is organised and accessed by macOS.
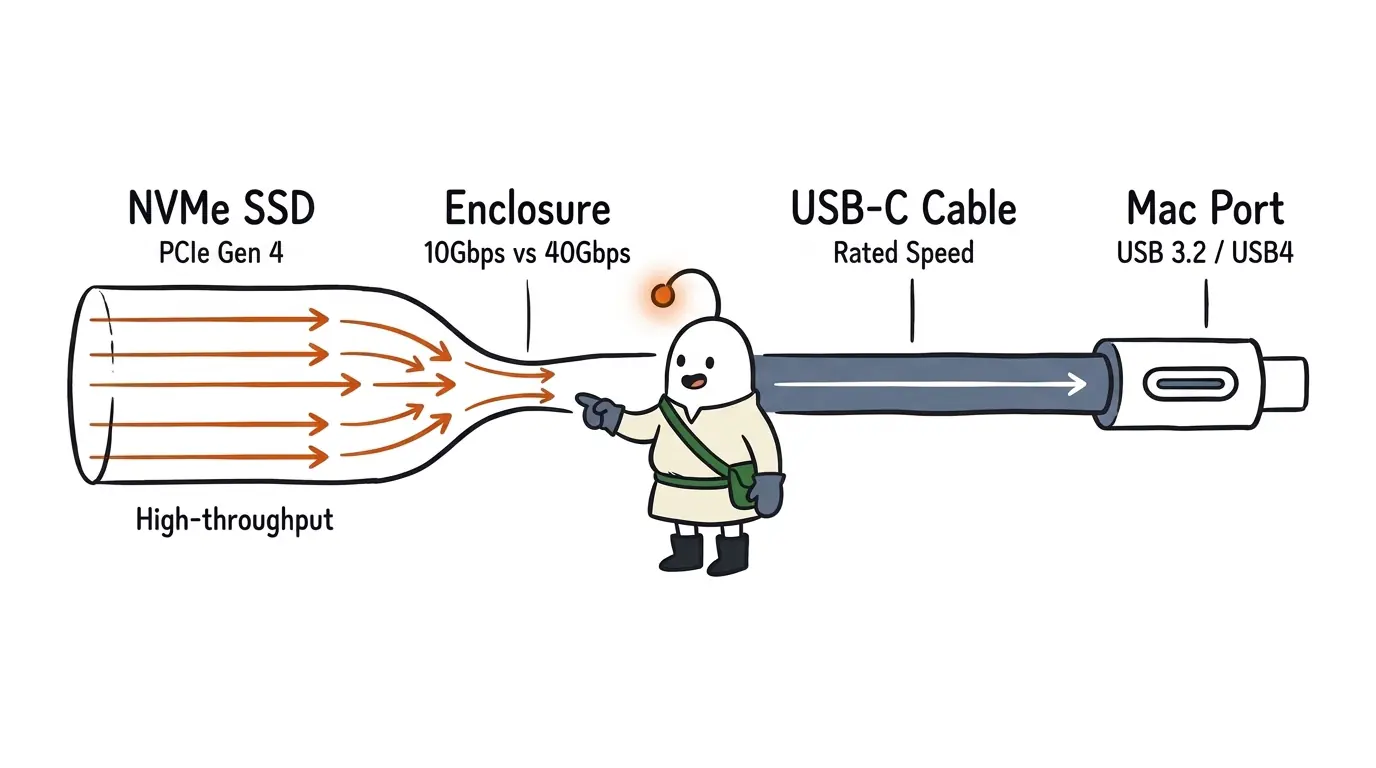
If any of these are incompatible, your drive may not work correctly or may not perform at its full potential.
For example, the Satechi USB4 Slim NVMe SSD Enclosure (ST-EU4SNSS) supports M.2 NVMe SSDs in 2230, 2242, 2260 and 2280 sizes, with capacities up to 8TB. It uses a USB4 40Gbps connection but does not support M.2 SATA SSDs or SSDs with pre-installed heatsinks. It also requires the supplied thermal pad to be installed correctly.
This is one specific example, not a compatibility rule for every enclosure. Always check the exact specifications of the external enclosure you're purchasing. See Satechi's USB4 NVMe enclosure manual.
3. What to look out for before buying an external enclosure
A. What type of SSD do you have?
M.2 SSDs come in various sizes. Common sizes include:
- 2230
- 2242
- 2260
- 2280
The first two digits describe the approximate width of your SSD in millimetres, and the last two digits describe its length. So, a 2280 SSD would be around 22mm wide and 80mm long.
Ensure your external enclosure supports your SSD size. Some will support multiple sizes, whilst others will only work with a specific size.
Also ensure your external enclosure supports:
- M.2 NVMe PCIe SSDs.
- The correct M.2 key and connector configuration.
- The capacity of your SSD.
- The physical height of your drive, including any pre-installed heatsink.
Not all external enclosures will work with every 2280 NVMe SSD. Some manufacturers have additional compatibility requirements involving SSD controllers, capacity and physical design.
For example, ASUS provides compatibility guidelines for different enclosure models. Its supported SSD sizes and capacities vary by model, so check its official SSD enclosure compatibility guide before purchasing.
B. USB 10Gbps or USB4 40Gbps?
The external enclosure will have a large impact on the speed of your data transfers.
Two common options are:
| Connection | Theoretical interface bandwidth | Typical use |
|---|---|---|
| USB 3.2 Gen 2 | 10Gbps (1.25GB/s) | General storage, backups, documents, photos and everyday transfers |
| USB4 40Gbps | 40Gbps (5GB/s) | Higher-bandwidth storage workloads and large media files |
These are interface bandwidth figures, not guaranteed file-transfer speeds. Actual performance will depend on your SSD, external enclosure, Mac port, cable, workload and other limitations.
There is also a newer USB4 specification worth knowing about. USB4 Version 2.0 supports bandwidth up to 80Gbps with compatible devices and certified cables. However, this does not mean every USB4 enclosure or Mac supports 80Gbps. Always check the specifications of the exact products you're using. See the USB-IF USB4 specifications.
OWC provides a useful example with its Express 1M2 enclosure. OWC lists real-world speeds of up to 3,189MB/s when connected to supported Apple Silicon Macs with M1, M2, M3, M4 or M5 chips. This is a manufacturer-reported result for that specific enclosure and setup, not a speed that every USB4 enclosure will achieve. See OWC's Express 1M2 specifications.
Using a 10Gbps external enclosure may be the best option for you. If you're doing mostly document work, general backups and occasional transfers, it doesn't necessarily make sense to pay extra for a faster enclosure.
C. What port does your Mac have?
Not all USB-C ports are the same. USB-C describes the physical connector, not the data-transfer speed or supported protocol.
The speed will depend on your Mac and the device you're connecting to. A Mac may have a USB-C port that supports a different data-transfer speed or connection type from another Mac with an identical-looking port.
Apple has a guide to help you identify which ports your Mac has: Identify the ports on your Mac.
Once you know what model you have, follow these steps:
- Click the Apple menu.
- Select About This Mac.
- Take note of your Mac model.
- Go to the technical specifications for your Mac on Apple's website.
- Check whether its port supports the connection type required by your external enclosure.
Do not assume that all Macs with the same USB-C connector support the same transfer speeds.
D. What cable do you have?
Another thing to consider is your cable.
Even if your external enclosure supports USB4 40Gbps, connecting it with a cable that supports a lower data-transfer speed may limit the connection.
Always check what speed the cable is rated for. Don't judge it just by whether it fits into your USB-C port or supports fast charging. Charging capability and data-transfer capability are different things.
Also, a faster cable won't increase the speed of a slower external enclosure. Your connection will still be limited by the other components in the setup.
Satechi explains this in its external SSD speed troubleshooting guide.
E. Heat dissipation
Some NVMe drives can get quite hot when transferring large amounts of data. If your SSD or external enclosure doesn't have suitable heat dissipation, the SSD may reduce its performance to control its temperature. This is known as thermal throttling.
Ensure you have an external enclosure with suitable thermal management. This could include a thermal pad, a metal enclosure or active cooling, depending on the product.
Ensure you've added the thermal pad as instructed by the manufacturer. Satechi specifically requires the supplied thermal pad to be installed correctly in its USB4 enclosure.
Also, check whether the enclosure supports SSDs with pre-installed heatsinks. Some slim enclosures do not have enough physical space for them.
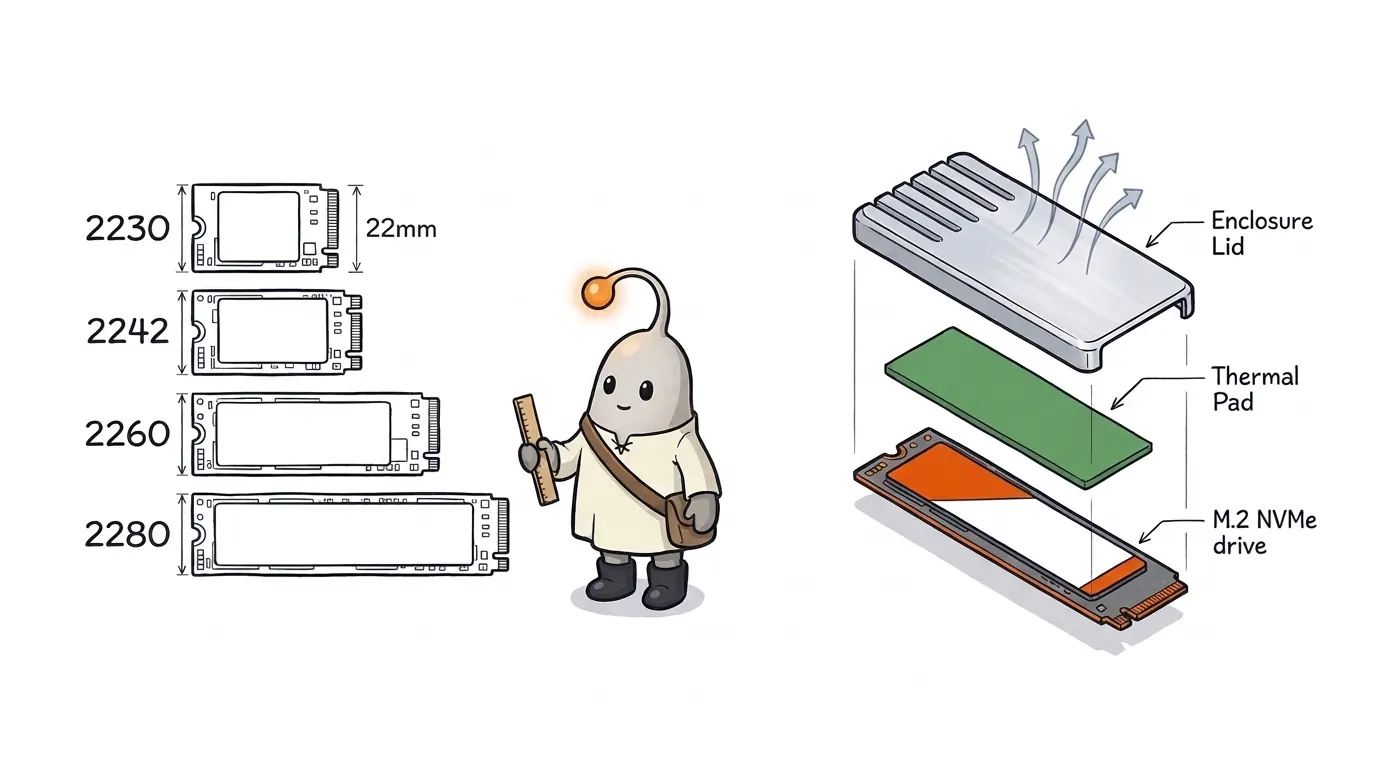
A fast SSD and enclosure are not much use if the drive cannot maintain its performance during the type of transfers you're doing. However, remember that thermal throttling and connection bandwidth are different limitations. Improving cooling won't remove a USB bandwidth limit.
4. Why your NVMe SSD may not run at the speeds advertised
This can be one of the most confusing parts when choosing your external NVMe drive.
SSDs may advertise speeds of several thousand MB/s, but these figures are often measured using a direct internal PCIe connection.
Once you put an NVMe SSD into an external enclosure, your Mac no longer communicates with the SSD over a direct internal PCIe connection. Instead, the SSD communicates with the enclosure's bridge/controller over its internal PCIe connection. The enclosure then presents the drive to your Mac through its external interface, such as USB or USB4.
For example:
- Your NVMe SSD provides very fast speeds internally through PCIe.
- Your external enclosure provides a 10Gbps USB 3.2 Gen 2 connection.
- Your Mac provides a faster USB4 connection.
- Your cable supports the enclosure's 10Gbps connection.
Your external enclosure will not be able to exceed its 10Gbps external connection limit, even if you have a faster Mac port and cable.
To put those numbers into perspective:
- 10Gbps is equivalent to 1.25GB/s of theoretical raw bandwidth.
- 40Gbps is equivalent to 5GB/s of theoretical raw bandwidth.
These are theoretical conversions. Actual file-transfer speeds will be lower because of protocol overhead, the enclosure controller, the SSD and other limitations.
However, the reverse can also happen. If you have a fast enclosure but a slower SSD, the SSD may not provide the same speeds as a high-end NVMe drive.
This can be thought of as a pipeline. The slowest relevant component can limit the overall transfer speed.
How to check what connection your Mac has
Once you've connected your external SSD:
- Hold down the Option key.
- Click the Apple menu.
- Select System Information.
- Go to the relevant USB or Thunderbolt section.
- Check what device and connection information macOS shows.
What information appears will depend on the device and connection you're using. Apple has a guide explaining how to access System Information.
A quick way to get an indication of your transfer speeds is to copy a large file to the SSD and observe the transfer rate. Generally, transferring one large file will be easier to interpret than transferring thousands of smaller files, as smaller files can involve additional file-system overhead.
Remember that this is only a practical indication, not a controlled benchmark. The speed of the source drive, file size, available cache and other system activity can also affect the result.
5. APFS or exFAT?
Once you've connected your SSD to your Mac, you may be prompted to initialise or format your drive. Choose the correct format based on how you plan to use it.
| File system | Best use | Important detail |
|---|---|---|
| APFS | Drives used mainly with modern Macs | Apple's file system for macOS 10.13 and later; supports external storage |
| APFS (Encrypted) | Protecting sensitive files on Mac storage | Encrypts the volume and can also be used on compatible external SSDs |
| exFAT | Transferring files between Mac and Windows | Designed for cross-platform compatibility |
| NTFS | Drives mainly used with Windows | macOS may read NTFS drives but does not provide native write support |
Apple has a guide to the different file systems available in Disk Utility: File system formats available in Disk Utility.
It also has a guide explaining why you may have issues writing to an external drive: If your Mac can't save files to an external drive.
If you're mainly using your SSD with Macs, then APFS would generally be the best option. If you want encryption, APFS (Encrypted) would be a suitable choice. It encrypts the volume, including when used on a compatible external SSD. Ensure you keep the password safe because you'll need it to unlock the volume.
If you need to transfer files between macOS and Windows, exFAT would generally be the best option.
One thing to remember: Disk Utility does not support formatting a drive as NTFS. macOS may be able to read files from an NTFS drive, but it does not provide native write support.
Formatting will delete the data on the selected drive. Be sure to back up any data you need before changing its format.
6. Formatting your NVMe SSD
Once your NVMe SSD is in its external enclosure and connected to your Mac, you can format the drive using Disk Utility.
Warning: This process will erase the data on your chosen drive. Ensure you're formatting your external SSD and not your Mac's internal storage.
Follow these steps:
- Open Disk Utility from Applications > Utilities.
- Select View > Show All Devices.
- Select your external NVMe SSD from the sidebar.
- Select the physical drive at the top of the device hierarchy.
- Click Erase.
- Enter a name for your drive.
- Select GUID Partition Map under Scheme.
- Choose either APFS or exFAT, based on how you plan to use the drive.
- Click Erase and wait for the formatting to complete.
If the Scheme option isn't available, check that you've selected the physical storage device rather than one of its volumes.
Apple has a guide to help you initialise your external storage device: Initialize an external storage device in Disk Utility.
Once formatted, you should be able to see your drive in Finder. You can now transfer your files.
Important: Before disconnecting your external SSD, eject it properly through Finder. Removing the drive whilst data is being written or before it has been safely ejected can result in corrupted or lost files. Satechi also explicitly recommends ejecting its enclosure before disconnecting it.
7. What can I use my external NVMe SSD for?
An external NVMe drive can be useful for more than just storing your documents and photos.
You can use it for:
- Large video and photo libraries.
- Project files and development repositories.
- Virtual machine files and disk images.
- Large datasets and local AI model files.
- Archives and other files you don't need on your internal drive.
- Backups using a compatible backup workflow.
As a developer, having an external SSD can give you more room for large projects and certain development data.
You can store active project folders and development repositories on an external SSD. However, don't move system folders or application-support folders just because they're taking up lots of space. Some applications expect files to remain in specific locations or require you to change their storage location through supported settings.
Ensure any important data is backed up separately. An external SSD is additional storage, not automatically a backup. If you only have one copy of a file on your external SSD, you may lose it if the drive fails.
8. Can I install macOS onto my external NVMe SSD?
Yes! Apple supports using an external storage device, such as a USB or Thunderbolt drive, as a Mac startup disk.
When using an SSD as a macOS startup disk, Apple recommends APFS. However, your macOS installation will be specific to your Mac model. You should not expect an external installation to start up other Mac models.
There are also a couple of important limitations to understand:
- Apple silicon Macs: Starting up from an external storage device requires the built-in startup disk to be working. If the built-in startup disk has a hardware failure, you cannot use an external startup disk as a replacement.
- Intel Macs with the Apple T2 Security Chip: External booting may need to be allowed through Startup Security Utility. By default, external or removable media booting can be restricted by the security settings.
Apple has full instructions on how to set up an external drive as a startup disk: Use an external storage device as a Mac startup disk.
For most users, an external NVMe SSD will be easier to use for additional file and project storage rather than as a replacement startup disk.
9. My Mac isn't recognising my NVMe SSD
If your drive isn't showing up in Finder, don't immediately assume that the SSD is faulty.
Check the following:
- External enclosure: Ensure it supports your exact type, size and capacity of NVMe drive.
- Cable: Try using the cable included with your external enclosure or another cable with the correct data-transfer speed.
- Connection: Try connecting directly to your Mac without any hubs or docks.
- System Information: Check whether your device is recognised by macOS.
- Disk Utility: Open Disk Utility and select View > Show All Devices. Check whether you can see the physical drive and its volumes.
- Manufacturer instructions: Check whether your external enclosure has specific firmware, compatibility or installation requirements.
Apple also recommends checking your cable and ensuring your external device appears in System Information when troubleshooting connection problems. See Apple's external-device connection guidance.
If your SSD is showing in System Information but not in Finder, you'll need to investigate its partition and file-system status. The physical device may be detected even when its volume isn't mounted or isn't formatted in a way macOS can use.
If it contains important data, don't try to erase or initialise it until you've confirmed that the data is backed up or recoverable.
10. Will an external NVMe SSD help with my full Mac?
An external NVMe SSD can give you more room to work with, but it may not solve all your internal storage issues.
For example, you can move large video files or certain development projects to your external SSD. But you may still have applications, caches, downloads, local AI model files, Xcode data, simulator runtimes and other files taking up your Mac's internal storage.
It can be worth knowing what's actually taking up your internal storage before deciding what to move or remove.
Diskfern is a native macOS storage analyzer and cleanup utility. It helps you understand what's consuming your storage by visualising disk usage and allowing you to inspect large files and folders. This can be particularly useful when large developer files and other storage-heavy data are taking up space on your Mac.
You can find it at Diskfern.
Summary
An NVMe SSD can be a great external storage solution for your Mac, but there are a few things to take into consideration before purchasing one.
Check the NVMe protocol, M.2 size, external enclosure compatibility, Mac port, cable speed and heat dissipation. Choose between APFS or exFAT based on how you're going to use it.
The worst thing you can do is pay for a fast internal NVMe drive and have its performance limited by the external enclosure or cable. Ensure your whole setup matches your Mac and your workflow.
The Diskfern way
How Diskfern helps
Even when you move media libraries or repositories to an external NVMe SSD, macOS internal storage can still fill up with caches, Xcode build folders, and simulator runtimes.
- Run a read-only scan with Diskfern to visualize what is taking up internal Mac storage.
- Inspect large files and folders carefully before deciding what to offload or delete.
Finding and reviewing is free. Moving items to the Trash from Diskfern is part of Pro.
Download DiskfernQuestions
Are all M.2 SSDs NVMe?
No. M.2 refers to the physical form factor and connector arrangement. Some M.2 SSDs use NVMe over PCIe, whilst others use SATA. Always check the specifications of your SSD and external enclosure.
Is NVMe faster than SATA?
Generally, NVMe drives offer higher potential speeds and lower latency than SATA SSDs. However, your actual speeds will depend on your drive, connection type, external enclosure, host and workload. If you have a fast NVMe SSD but a slower external enclosure, your transfer speeds will be limited by the external connection.
Will a USB-C NVMe external enclosure work with all Macs?
No. You'll need to check which SSD type, size and connection type your external enclosure supports, as well as which ports are available on your Mac.
Should I choose 10Gbps or 40Gbps?
A 10Gbps external enclosure may be enough for general file storage and backups. A 40Gbps USB4 enclosure may make more sense if you're using it for large media files and demanding transfers. Ensure your Mac and cable support the required connection. Choose based on your actual workflow rather than just the highest advertised speed.
Can I use my external NVMe SSD with both Mac and Windows?
Yes. You can use an external NVMe SSD with both operating systems if you format it using a compatible file system, such as exFAT. APFS would generally be better for a drive used mainly with modern Macs. Ensure you back up your drive before reformatting it.
Would an external NVMe SSD be good for Xcode projects?
It can be useful for storing large Xcode project folders and development repositories. However, application-managed data, build directories and other development files may have specific location requirements. Check the documentation for your tools before relocating application-managed data. Test your workflow before relying on the external drive, and ensure you have a separate backup.

Written by
Diskfern Team
We explain Mac storage using product behavior and the sources listed below. Review your app settings and backups before removing data.
Sources
- Seagate – SSD Types: SATA, NVMe, M.2, U.2 and PCIe · checked November 11, 2026
- ASUS – SSD Enclosure Form Factor and Capacity Compatibility · checked November 11, 2026
- Satechi – USB4 NVMe SSD Enclosure User Manual · checked November 11, 2026
- Satechi – Why SSD Transfer Speeds Can Be Slow · checked November 11, 2026
- USB-IF – USB4 Specifications · checked November 11, 2026
- Apple – Identify the Ports on Your Mac · checked November 11, 2026
- Apple – File System Formats Available in Disk Utility · checked November 11, 2026
- Apple – If Your Mac Can't Save Files to an External Drive · checked November 11, 2026
- Apple – Initialize an External Storage Device in Disk Utility · checked November 11, 2026
- Apple – Use an External Storage Device as a Mac Startup Disk · checked November 11, 2026
- Apple – Startup Security Utility on a Mac with an Apple T2 Security Chip · checked November 11, 2026
- Apple – System Information User Guide · checked November 11, 2026
- Apple – External Device Connection Guidance · checked November 11, 2026
- OWC – Express 1M2 USB4 NVMe Enclosure · checked November 11, 2026
Keep reading
Learn more about managing large media, cloud sync, and external drives on Mac.
How to check SSD health on Mac
Learn how to check SSD health on Mac. Step-by-step instructions for Disk Utility S.M.A.R.T. status, terminal smartctl commands, and reading NVMe wear metrics.
External drive storage on Mac
See how much space is used on an external drive in Finder, Get Info or Disk Utility, then find the files filling it up. Works for USB and SSD drives.
1TB SSD PS5 Can I Use On Mac?
Can you use a 1TB PS5 SSD on a Mac? Learn how external USB and internal M.2 NVMe formats compare, why formatting wipes games, and when exFAT works.
Can't copy large file to USB drive on Mac
Why macOS won't copy files over 4GB to a USB drive with free space. Learn how FAT32 limits individual files and how to safely format as exFAT without losing data.
How to find large files on Mac
Finder's search can find large files, but it's slow and easy to misuse. Here's how to find them properly, plus faster methods for big drives.

Get your space back. Start with a free scan.
Explore the files and folders Diskfern can read. Your files stay on your Mac, and nothing is removed until you say so.
macOS 14 Sonoma or later · Apple silicon and Intel