Apps
How to Free Up Scratch Disk Space in Photoshop: A Complete Guide for Mac and Windows
Photoshop's "Scratch disks are full" error can stop you from opening documents, creating new images, applying filters, or saving your work. It can even prevent Photoshop from launching. The confusing part is that the error does not necessarily mean your Photoshop project is unusually large or that your computer has run out of all its storage. Photoshop might be using a nearly full drive, retaining temporary editing data, processing an oversized image, or relying on a scratch disk that is incorrectly configured. To free up scratch disk space, identify the drive Photoshop actually uses, reclaim storage on that volume, and reduce unnecessary temporary working data. Adobe recommends maintaining at least 100 GB of available space on the primary scratch disk drive. This is a troubleshooting recommendation, not a fixed requirement for every project. This guide explains how scratch disks work, how to identify what is consuming their space, how to fix the error on macOS and Windows, and how to configure Photoshop to avoid repeated storage problems.
 Diskfern Team14 min readUpdated
Short answer
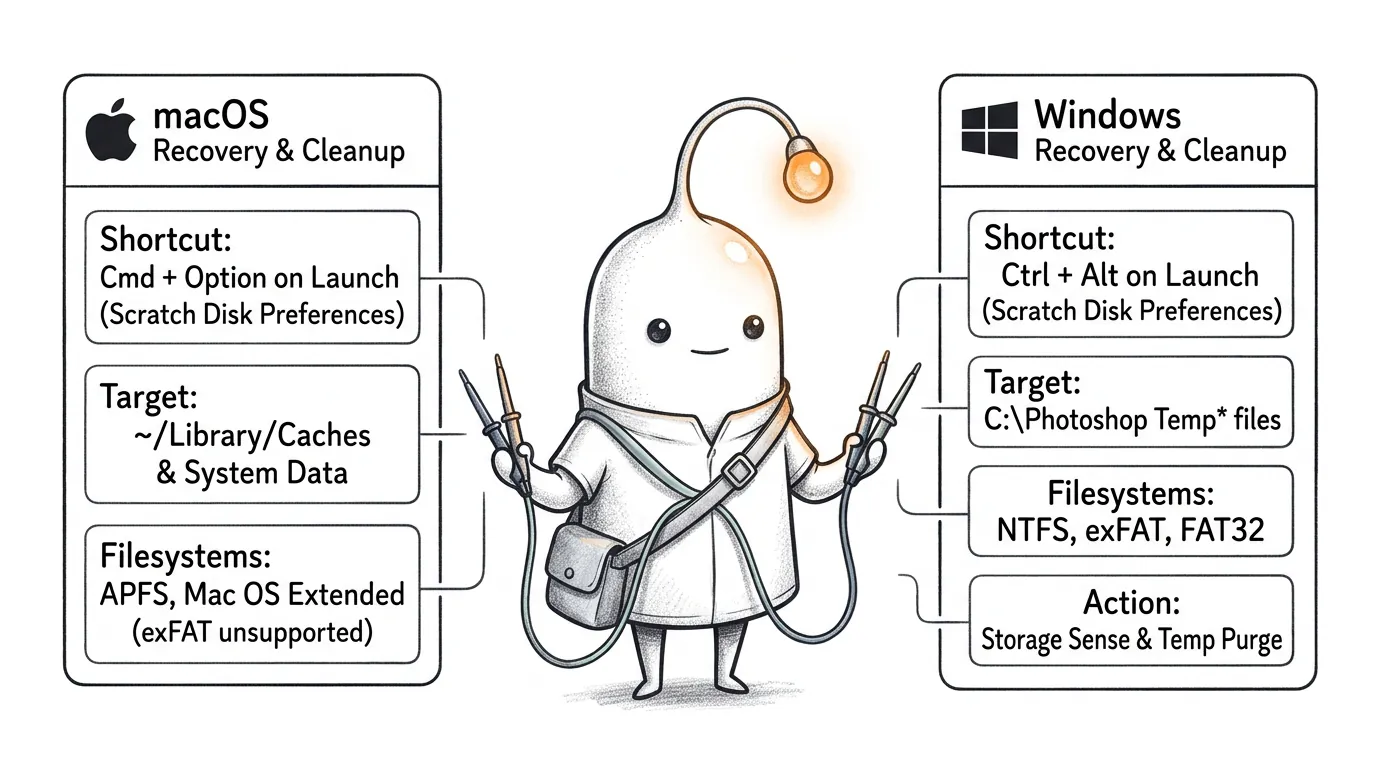
To free up scratch disk space in Photoshop, first verify which drive is selected in Preferences > Scratch Disks. Free up space on that specific volume aiming for Adobe's recommended 100 GB. On Windows, delete leftover 'Photoshop Temp' files from the C: drive root after quitting. On macOS, clean up startup caches and empty the Trash. If Photoshop won't launch, hold Cmd + Option (macOS) or Ctrl + Alt (Windows) during startup to select an alternate scratch disk.
The quickest way to fix a Photoshop scratch disk full error
Try these steps in order: 1. Save your Photoshop documents if the application is still responsive. 2. Identify the drive selected under Photoshop's Scratch Disks preferences. 3. Check how much free space that specific drive has. 4. Free up unnecessary storage on that volume. Aim for Adobe's recommended 100 GB of available space. 5. On Windows, remove leftover files beginning with Photoshop Temp from the root of the C: drive, after completely quitting Photoshop. 6. On macOS, clean up the selected startup or scratch volume and empty the Trash. 7. Restart Photoshop and test the operation that previously failed. If Photoshop cannot launch, Adobe also documents a keyboard shortcut for choosing a different scratch disk during startup: - macOS: Hold Command + Option while launching Photoshop. - Windows: Hold Ctrl + Alt while launching Photoshop. These steps are based on Adobe's current scratch disk troubleshooting guide and its scratch disk configuration documentation. The startup shortcut is also documented in Adobe's Photoshop performance guidance.
1. What is a Photoshop scratch disk?
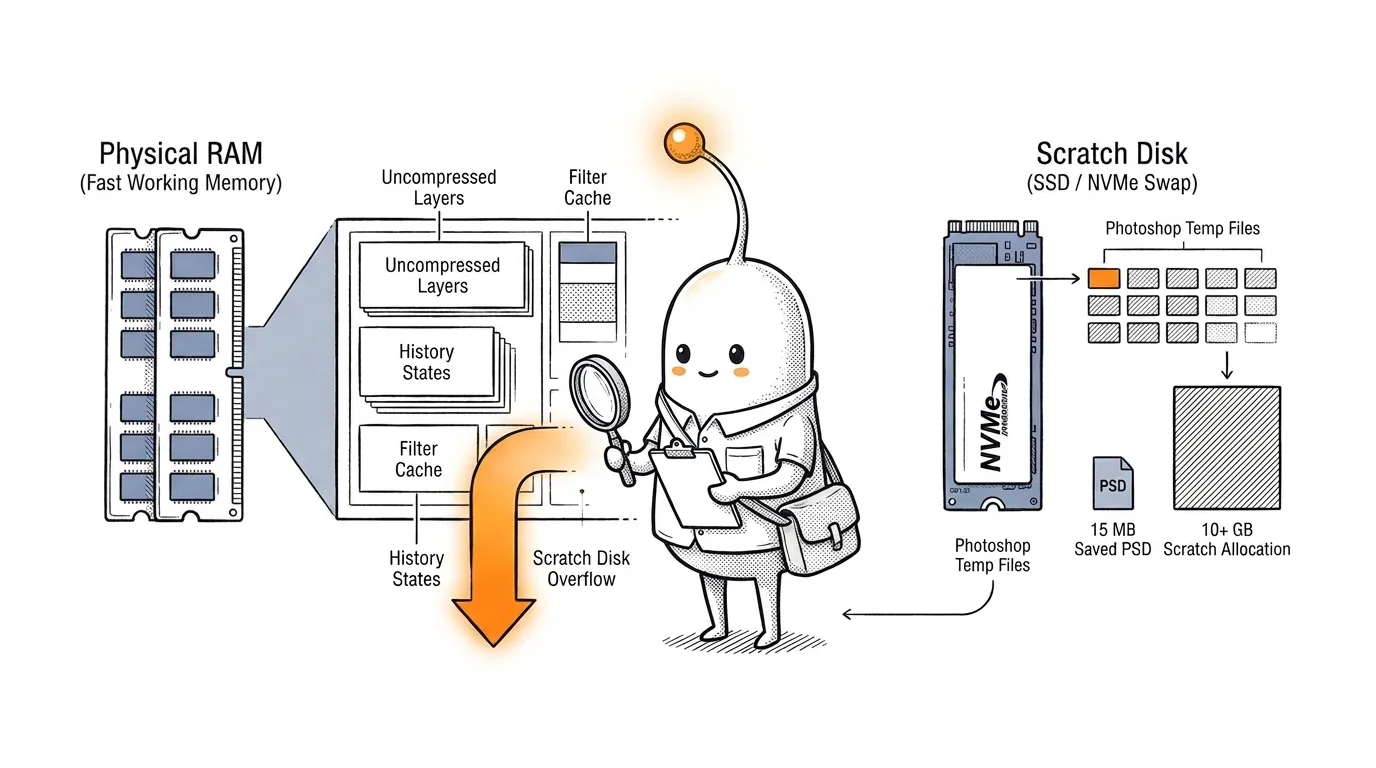
A scratch disk is a storage volume that Photoshop uses for temporary working data when its available RAM cannot accommodate the current workload. Think of RAM as Photoshop's fast working area and the scratch disk as additional temporary storage on an SSD or hard drive. When you edit an image, Photoshop needs to process more information than what you see on the screen. It may need to retain previous editing states, process image data, manage clipboard information, and perform operations involving layers, filters, masks, and selections. When available memory is insufficient, Photoshop uses storage as temporary virtual memory. The scratch disk is therefore different from: - RAM: Physical system memory used during application operations. - The Photoshop project file: The saved PSD or PSB containing your document. - Your exported image: The final JPEG, PNG, TIFF, or other output. - General temporary files: Files created by the operating system or other applications. A Photoshop document can have a relatively small saved file size while requiring considerably more working storage during editing. For example, a compressed JPEG photograph might be only 15 MB. Opening it in Photoshop and working with multiple layers, masks, adjustments, and history states can require much more memory and scratch storage. Adobe describes scratch disks as hard drives or SSDs used for temporary storage when RAM is insufficient for current operations. Source: Adobe – Set Up and Manage Scratch Disks.
2. Why does Photoshop say scratch disks are full?
The error occurs when Photoshop cannot obtain enough usable temporary storage from its configured scratch disk. There are several possible causes.
| Possible cause | What happens | What to check |
|---|---|---|
| Insufficient free storage | Photoshop cannot allocate the required temporary space | Available space on the selected volume |
| Wrong scratch disk | Photoshop uses a different drive from the one you cleaned | Scratch Disk preferences |
| Large image dimensions | More pixels require more working data | Width and height in pixels |
| High bit depth | Each pixel requires more color information | 8-, 16-, or 32-bit/channel mode |
| Many layers and channels | Additional image information increases working requirements | Layers, masks, channels and Smart Objects |
| Large editing history | Previous editing states require additional resources | History States setting |
| Auto-Recovery data | Recovery operations can consume additional scratch storage | File Handling preferences |
| Too many open documents | More documents increase the total working set | Open Photoshop documents |
| External drive problems | The selected volume may be disconnected, unavailable, or unsuitable | Connection, permissions and filesystem |
| Accumulated temporary data | Previous editing sessions or unexpected shutdowns may leave temporary files | Adobe's documented cleanup procedure |
Not all these problems require the same solution. For example, deleting downloaded files may help when a drive is nearly full, but it will not correct an incorrectly configured scratch disk or an oversized image. Adobe specifically identifies insufficient drive space, History States, and Auto-Recovery as factors to investigate. Source: Adobe – Troubleshoot Scratch Disk Full Errors.
3. First identify the scratch disk Photoshop is using
This is the most important diagnostic step. Do not start deleting files until you know which storage volume Photoshop is using. Consider this example:
| Storage volume | Available space |
|---|---|
| Internal SSD | 9 GB |
| External SSD | 450 GB |
| Secondary internal drive | 120 GB |
Suppose Photoshop is configured to use the internal SSD as its primary scratch disk. Removing files from the external SSD will not directly resolve the issue because Photoshop still needs space on the internal volume.
Find the scratch disk on Windows
- Open Photoshop.
- Select Edit from the menu bar.
- Open Preferences.
- Select Scratch Disks.
- Review the selected drives.
Find the scratch disk on macOS
- Open Photoshop.
- Select Photoshop from the menu bar.
- Open Settings.
- Select Scratch Disks.
- Review the selected storage volumes.
The exact wording can vary between Photoshop releases. If multiple drives are selected, Photoshop can use them according to their configured priority. Adobe recommends placing the fastest available drive first. You can change these settings and select an additional volume if your current scratch disk does not have enough space. Source: Adobe – Set Up and Manage Scratch Disks.
4. How much free space does Photoshop need?
Adobe's current troubleshooting documentation recommends freeing up at least 100 GB on the primary scratch disk drive. This is an important recommendation, but it should be interpreted correctly. It does not mean that every Photoshop installation requires exactly 100 GB, or that having 100 GB guarantees that every image-processing operation will succeed. Actual requirements depend on: - Image dimensions. - Bit depth. - Number of layers. - Additional color and alpha channels. - Editing history. - Filters and other image-processing operations. - Available RAM. - Other open documents and applications. A photographer editing occasional web graphics may need substantially less temporary storage than someone working with large panoramas, commercial retouching projects, or high-resolution composites. Use Adobe's 100 GB figure as a practical starting target and maintain additional headroom for demanding projects. Source: Adobe – Troubleshoot Scratch Disk Full Errors.
5. How to free up scratch disk space on Windows
Windows provides several ways to identify and remove unnecessary files. The important point is to free space on the actual volume Photoshop uses.
Method 1: Remove leftover Photoshop temporary files
Adobe specifically recommends removing files beginning with Photoshop Temp in the root of the C: drive when troubleshooting scratch disk errors. Follow this sequence:
- Save your open Photoshop documents.
- Close Photoshop completely.
- Confirm that the application is no longer running.
- Open File Explorer.
- Select This PC.
- Open the C: drive.
- Look for files whose names begin with Photoshop Temp.
- Remove the matching leftover files.
- Restart Photoshop.
Do not delete arbitrary files just because their extensions are .tmp or their names look unfamiliar. Do not remove temporary files while Photoshop is actively using them. Also, Adobe specifically identifies the C: drive in its troubleshooting instructions. Do not assume that every temporary file on every volume belongs to Photoshop. Source: Adobe – Troubleshoot Scratch Disk Full Errors.
Method 2: Use Windows Cleanup Recommendations
Windows 11 and Windows 10 include built-in storage management. To use Cleanup Recommendations:
- Open Settings.
- Select System.
- Select Storage.
- Open Cleanup recommendations.
- Review the available categories.
- Check Temporary files, Large or unused files, and Unused apps.
- Select the items you no longer need.
- Select Clean up.
Pay particular attention to the files Windows recommends removing. The Downloads folder may contain important documents, installers, and project files, so do not assume everything in it is unnecessary. Source: Microsoft – Free Up Drive Space in Windows.
Method 3: Configure Storage Sense
Storage Sense can automatically remove eligible temporary files and manage the Recycle Bin. To configure it:
- Open Settings.
- Select System.
- Select Storage.
- Open Storage Sense.
- Enable the feature.
- Review its cleanup schedule and file-retention settings.
One important limitation: Microsoft documents that Storage Sense works on the system drive, usually C:. If Photoshop uses another volume, such as D: or E:, you must investigate that drive separately. Also check the Downloads and cloud-storage retention settings before enabling automatic cleanup. Sources: Microsoft – Manage Drive Space With Storage Sense Microsoft – Windows Storage Settings.
Method 4: Use Disk Cleanup
Older Windows installations and some Windows 10 configurations may still provide the traditional Disk Cleanup utility:
- Open the Windows search box.
- Search for Disk Cleanup.
- Select the drive you want to clean.
- Review the suggested categories.
- Select the files you no longer need.
- Select OK.
You can also choose Clean up system files to review additional categories. Be especially careful with Previous Windows Installation files. Removing them can delete the ability to roll back to an earlier Windows installation. Source: Microsoft – Free Up Drive Space.
Method 5: Find and move large personal files
If the usual cleanup methods are insufficient, inspect large personal files. Common storage consumers include: - Video recordings. - High-resolution photographs. - Downloaded archives. - Old Photoshop projects. - Exported image collections. - Duplicate project folders. - Large installers. - Unused applications. To sort files by size: 1. Open File Explorer. 2. Navigate to a folder. 3. Select Details view. 4. Select the Size column. 5. Review the largest items. Move important files to another suitable drive instead of deleting them. Maintain a verified backup before removing original project files.
6. How to free up scratch disk space on Mac
On macOS, Photoshop commonly uses the startup disk as its scratch disk unless another volume has been configured. If the Mac's internal storage becomes full, Photoshop may stop working even though an external drive has plenty of available capacity.
Method 1: Use macOS Storage settings
macOS provides a built-in storage overview. On macOS Ventura 13 and later: 1. Select the Apple menu. 2. Open System Settings. 3. Select General. 4. Open Storage. 5. Review the storage categories. Older macOS releases use: Apple menu > About This Mac > Storage Inspect the storage categories and determine which files and applications are taking up the most space. Apple identifies the following useful cleanup opportunities: - Applications you no longer use. - Large Downloads. - Movies and other media. - Old device backups. - Unnecessary documents. - Items in Trash. Source: Apple – Free Up Storage Space on Mac.
Method 2: Understand what System Data actually means
System Data is one of the most confusing storage categories in macOS. It does not represent one specific folder or application. Apple describes System Data as a general category for Apple and third-party files that do not belong to more specific storage categories. It can include several kinds of data, such as caches, logs, temporary files, application support data, and other system-related information. This distinction matters because deleting an arbitrary folder named Library, Caches, or Application Support is not a safe way to reclaim storage. Instead: 1. Identify the folders occupying the most space. 2. Understand which application owns them. 3. Determine whether their contents are replaceable. 4. Check whether deleting them could affect application functionality or user data. 5. Remove only files you have identified and no longer need. Source: Apple – Free Up Storage Space on Mac.
Method 3: Review the Downloads folder
The Downloads folder is one of the easiest places to investigate. It may contain: - Old application installers. - ZIP archives. - Large images. - Video files. - Duplicate downloads. - Exported projects. - Unused documents. To inspect it: 1. Open Finder. 2. Select Downloads. 3. Change to List view. 4. Sort by Size. 5. Review the largest files. Move important files elsewhere or remove those you no longer need. Avoid deleting files solely because they are large.
Method 4: Move large media libraries to external storage
Photos, videos, and creative projects can consume considerable internal storage. Apple documents moving supported media libraries, including Photos and iMovie libraries, to another connected storage device. Before moving a library: 1. Quit the application using it. 2. Make a verified backup. 3. Follow the application's documented relocation procedure. 4. Confirm that the relocated library opens correctly. Do not remove the original until you have confirmed that the new copy works. Source: Apple – Free Up Storage Space on Mac.
Method 5: Empty the Trash
This is a frequently overlooked step. Moving a file to Trash does not immediately reclaim its storage. You must empty the Trash before that space becomes available. Open Trash, review its contents, and permanently remove only the files you no longer need. Apple explicitly documents this behavior in its storage guidance. Source: Apple – Free Up Storage Space on Mac.
Method 6: Find unusually large folders and files
Sometimes the largest storage consumers are not visible in the Downloads folder or the macOS Storage overview. They may be distributed across: - Application data. - Large project folders. - Media libraries. - Archived documents. - Local backups. - Developer directories. - Temporary application data. A storage analyzer can make this investigation easier by presenting files and folders according to their actual storage usage. For example, Diskfern provides a visual Mac storage analyzer with treemap and list views, large-file search, and inspection tools. It can help identify large files and folders that are worth reviewing. It is not a Photoshop scratch-disk repair utility and cannot replace Photoshop's own Purge command or scratch-disk settings. See Diskfern's Mac storage analysis features.
7. Clear Photoshop's accumulated editing data
Cleaning the operating system's storage is only one part of resolving scratch disk problems. Photoshop also retains working information during editing sessions. Adobe provides the Purge command to clear accumulated temporary data. How to use Photoshop Purge: 1. Open Photoshop. 2. Save your important documents. 3. Select Edit. 4. Open Purge. 5. Choose the appropriate category.
| Option | What it clears |
|---|---|
| Undo | Undo-related editing data |
| Clipboard | Copied information |
| Histories | Previous editing history |
| Video Cache | Video-related cached data |
| All | All the available purge categories |
Use All only when you understand the consequences. Important: Photoshop's Purge command cannot be undone. Once you remove the relevant history or undo information, you cannot return to those earlier editing states using that history. The Purge operation is useful for clearing accumulated working data, but it should not be presented as a guaranteed replacement for freeing space on an almost-full physical drive. Source: Adobe – Fine-Tune Photoshop Features for Performance.
8. Reduce Photoshop History States
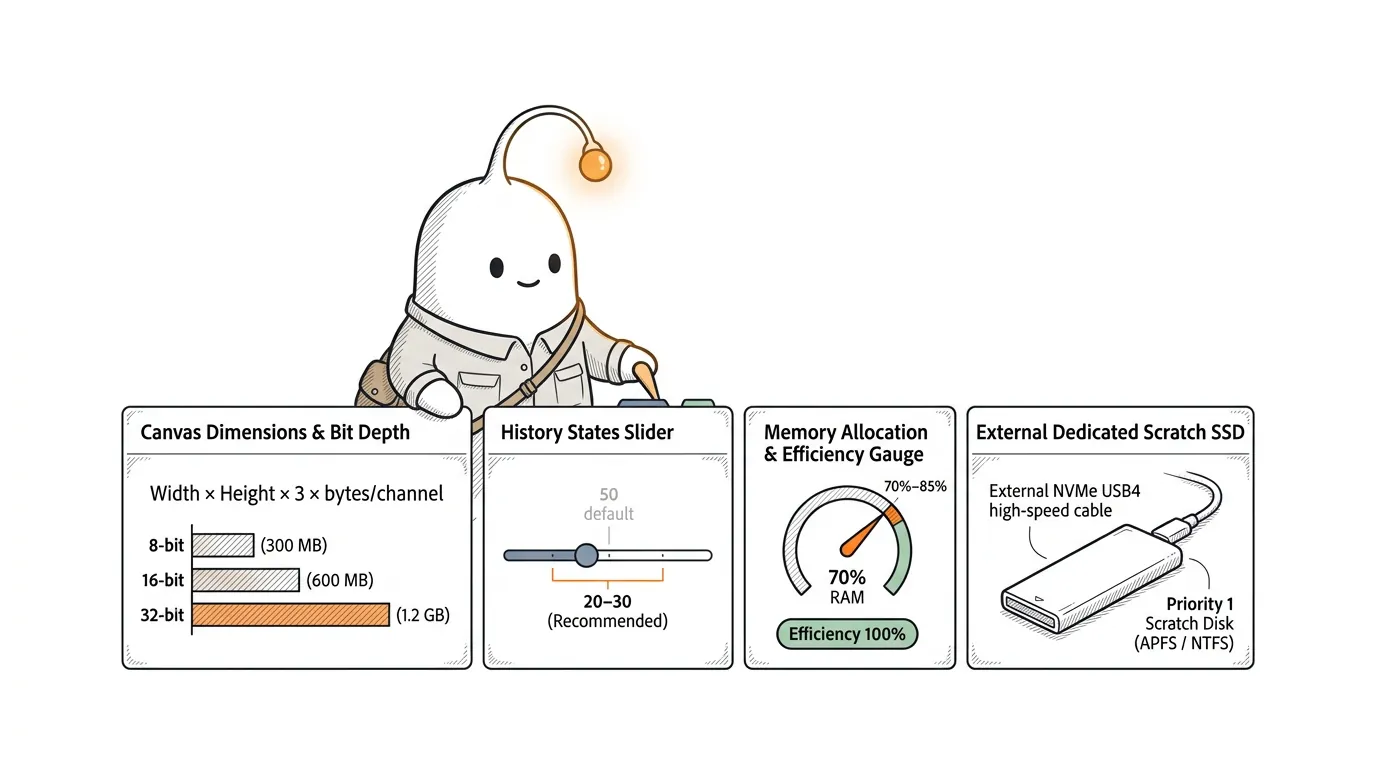
History States control how many previous editing operations Photoshop retains. For example, suppose you: - Adjust brightness. - Add a layer. - Apply a filter. - Change a mask. - Modify color balance. - Resize an image. Photoshop retains previous editing states so you can undo operations and return to earlier stages of the document. This is useful, but maintaining a very large history can increase memory and scratch-storage requirements. Adobe documents 50 as the default History States value and identifies 20–30 as a lower range that can conserve resources. How to reduce History States: 1. Open Photoshop. 2. Open Performance preferences. 3. Find the History & Cache section. 4. Locate History States. 5. Reduce the current value. 6. Select OK. The current menu paths are: - Windows: Edit > Preferences > Performance. - macOS: Photoshop > Settings > Performance. For large documents, try 20–30 history states as a starting point, then adjust according to how much undo flexibility your work requires. A lower number means fewer previous operations are available for undo. Remember that history states do not all require the same amount of data. An operation affecting an entire high-resolution image can require substantially more resources than a small localized adjustment. Sources: Adobe – Configure Photoshop Performance Preferences. Adobe – Troubleshoot Scratch Disk Full Errors.
9. Check Auto-Recovery settings before changing them
Photoshop includes automatic recovery functionality designed to help restore work after an unexpected crash. However, Adobe also identifies Auto-Recovery as a potential contributor to scratch-disk consumption during complex operations. This creates an important trade-off. Disabling recovery may reduce some temporary storage demands, but it also increases the amount of work you could lose after an unexpected shutdown. A safer approach is to: - Keep Automatically Save Recovery Information enabled. - Review the configured recovery interval. - Save important documents manually during extended editing sessions. - Keep sufficient free storage available. - Maintain separate backups of important projects. Adobe's current file-loss guidance recommends a five-minute recovery interval, although its documented default is ten minutes. Choose an interval appropriate for your workload and the amount of work you can afford to lose. Sources: Adobe – Troubleshoot Scratch Disk Full Errors. Adobe – Prevent File Loss in Photoshop.
10. Check your image dimensions before buying more storage
This is one of the most useful diagnostic steps, especially for users who regularly work with large images. A Photoshop document's saved file size does not tell you how much working memory or scratch storage it might require. The actual pixel dimensions and bit depth are important. Consider someone who intends to create a 1,080 × 1,080 pixel image but accidentally enters 1,080 × 1,080 inches. The resulting document is enormously larger than intended. Always verify that the dimensions are expressed in pixels when you are creating documents for digital use. Why pixel dimensions affect scratch storage: An RGB image has three color channels: - Red. - Green. - Blue. Each channel stores information for every pixel. A useful estimate of the base uncompressed RGB pixel data is: Image width × Image height × 3 × bytes per channel For an RGB document:
| Dimensions | Bit depth | Approximate base RGB data |
|---|---|---|
| 10,000 × 10,000 | 8 bits/channel | 300 MB |
| 10,000 × 10,000 | 16 bits/channel | 600 MB |
| 10,000 × 10,000 | 32 bits/channel | 1.2 GB |
| 30,000 × 30,000 | 8 bits/channel | 2.7 GB |
| 30,000 × 30,000 | 16 bits/channel | 5.4 GB |
| 30,000 × 30,000 | 32 bits/channel | 10.8 GB |
These are mathematical estimates using decimal storage units. They represent one uncompressed RGB pixel buffer, not a prediction of the total scratch disk requirement. Actual Photoshop working requirements can be higher because of: - Multiple layers. - Alpha channels. - Masks. - Smart Objects. - Editing history. - Temporary filter processing. - Additional image data. The distinction between a base pixel buffer and a Photoshop working document is essential. Adobe documents the relationship between pixel information, channels, bit depth, and image size. Sources: Adobe – Bit Depth in Photoshop. Adobe – Channels in Photoshop.
How to check the actual image dimensions
- Open the affected Photoshop document.
- Select Image.
- Select Image Size.
- Review Width and Height.
- Confirm the measurement units are Pixels.
- Check the bit depth under Image > Mode.
Do not reduce the image dimensions automatically. A high-resolution image might be necessary for large-format printing, professional photography, or detailed compositing. Only change dimensions when the original document contains more pixels than the intended output requires.
Understand the difference between PPI and pixel dimensions
One common misunderstanding is that reducing the resolution value in Photoshop will automatically make an image smaller. That is not always true. PPI refers to pixels per inch for print output. Pixel dimensions describe the actual number of pixels in the image. Changing PPI with Resample disabled changes the relationship between the image's pixel dimensions and its physical print size. It does not remove image pixels. To change the actual pixel count, use an appropriate resampling operation. However, resampling can reduce detail or alter image quality. Save a copy before making destructive changes. Source: Adobe – Image File Size Factors.
Understand how bit depth affects storage
Photoshop supports different bit depths, including: - 8 Bits/Channel. - 16 Bits/Channel. - 32 Bits/Channel. Higher bit depths store more color information and require more working resources. Adobe notes that 16-bit and 32-bit workflows can require more memory, scratch space, and processing time than 8-bit workflows. Converting a 16-bit or 32-bit document into 8-bit permanently discards some image information. Therefore, do not reduce bit depth solely to eliminate a scratch disk warning. If an 8-bit version is appropriate for the intended output, create and work on a copy while preserving the original higher-bit-depth document. Sources: Adobe – Bit Depth in Photoshop. Adobe – Photoshop Performance Optimization.
11. Inspect Photoshop's actual document size and scratch usage
There is another useful diagnostic feature that many users overlook. Photoshop can display document sizes, scratch sizes, and performance information through its document status and information displays.
Document Sizes
At the bottom of a Photoshop document window: 1. Open the document information pop-up. 2. Select Document Sizes. 3. Examine the displayed values. The two values represent different things: - The left value approximates the flattened document size. - The right value represents the approximate uncompressed size including layers and channels. This helps explain why a PSD containing many layers can be much larger in working terms than its flattened export. However, neither value should be treated as an exact measurement of the scratch disk space currently being used. Source: Adobe – Channels in Photoshop.
The Efficiency indicator
Photoshop also provides an Efficiency indicator. It shows whether Photoshop is processing within available memory or accessing the scratch disk. To display it: 1. Open a Photoshop document. 2. Find the status information menu at the bottom of the document window. 3. Select Efficiency. Interpret the result as follows:
| Efficiency | Interpretation |
|---|---|
| 100% | Photoshop is processing without needing to access the scratch disk for that measured work |
| Below 100% | Photoshop is using scratch storage |
| Consistently below 90% | The current workload may be putting substantial pressure on available memory |
A value below 100% is not itself a scratch disk failure. Scratch usage is normal when editing sufficiently large documents. The indicator helps identify whether memory capacity is contributing to slower performance. Sources: Adobe – Photoshop Performance Preferences. Adobe – Photoshop Performance Optimization.
12. Configure Photoshop's memory allocation correctly
Photoshop includes a Memory Usage setting that determines how much system RAM it can use. Memory allocation and scratch disk capacity are related, but they are not the same thing. Increasing Photoshop's memory allocation may reduce how frequently it needs scratch storage. However, it cannot create additional physical disk space. Adobe currently documents a default allocation of 70% of available RAM and advises against allocating more than 85% because the operating system and other applications also require memory. How to adjust memory allocation: 1. Open Photoshop. 2. Open Performance preferences. 3. Find Memory Usage. 4. Review the available RAM and recommended range. 5. Adjust the Let Photoshop Use value if necessary. 6. Select OK. 7. Restart Photoshop. Start with Adobe's recommended range rather than assigning nearly all available memory to Photoshop. If your usual workload causes consistently low Efficiency readings, investigate whether more system RAM would provide a meaningful improvement. Do not assume that increasing memory allocation will resolve a drive that already has insufficient free storage. Source: Adobe – Configure Photoshop Performance Preferences.
13. Reduce unnecessary loaded presets and open documents
Scratch disk consumption is not determined solely by the image currently visible on the screen. Photoshop also uses resources for other open documents and loaded resources. Adobe's performance guidance specifically identifies loaded brush tips and patterns as possible storage consumers.
Reduce unnecessary presets
If you have accumulated many brushes, patterns, shapes, or other presets: 1. Open the appropriate preset panel. 2. Select the presets you do not currently need. 3. Export or back up the selected presets. 4. Remove the unnecessary presets temporarily. 5. Import them again when required. Do not permanently delete custom presets that have not been backed up. Adobe identifies reducing loaded presets as one way to reduce scratch disk consumption. Source: Adobe – Photoshop Performance Optimization.
Close unnecessary documents
Every open document contributes to Photoshop's overall working requirements. When working with several large images simultaneously: - Save completed projects. - Close documents that are no longer needed. - Avoid keeping unnecessary duplicate documents open. - Reopen projects when they are required. This is particularly helpful when working with multiple high-resolution or layered documents. Source: Adobe – Photoshop Performance Optimization.
14. Add an external SSD as another scratch disk
If your internal drive consistently runs low on storage, adding another scratch disk can be a practical long-term solution. Photoshop supports additional storage volumes for scratch data. A suitable external SSD can provide additional capacity, particularly when the internal drive is relatively small.
Which filesystem should you use?
Adobe lists the following supported formats:
| Operating system | Supported scratch disk formats |
|---|---|
| macOS | APFS, Mac OS Extended (Journaled) |
| Windows | NTFS, exFAT, FAT32 |
An important compatibility detail is that exFAT is listed for Windows scratch disks but not in Adobe's macOS scratch disk list. Do not assume that an exFAT drive that works as general external storage will also be accepted as a Photoshop scratch disk on macOS. There is another Windows-specific consideration: FAT32 has a maximum individual file size of 4 GiB. That limitation can become relevant when working with large temporary files. Although Adobe lists FAT32 as supported, NTFS or exFAT is generally a more practical choice for large Windows scratch-disk workloads. Sources: Adobe – Troubleshoot Scratch Disk Full Errors. Microsoft Learn – File System Functionality Comparison.
How to add an external scratch disk
- Connect the external SSD directly to your computer.
- Confirm that it is mounted and writable.
- Open Photoshop.
- Open Scratch Disks preferences.
- Select the external drive.
- Move it into the appropriate priority position.
- Select OK.
- Restart Photoshop if required by the installed version.
- Confirm that the drive remains connected during editing.
Adobe recommends placing the fastest drive first. For performance-sensitive workflows, a directly connected SSD is generally preferable to a slower hard drive or network storage. Do not format an existing storage device without first backing up its contents. Formatting can erase the entire volume. Source: Adobe – Set Up and Manage Scratch Disks.
15. What if Photoshop still says scratch disks are full?
If the error continues after freeing storage, avoid repeatedly deleting random files. Use the following troubleshooting sequence.
| Symptom | What to investigate | Recommended action |
|---|---|---|
| Photoshop cannot launch | Primary scratch disk is full | Free storage or select a different scratch disk during startup |
| Photoshop opens but cannot create documents | Insufficient working space | Check the selected volume and document dimensions |
| Error appears only with large images | Image complexity or available memory | Inspect pixel dimensions, bit depth, layers and RAM |
| Error appears after extended sessions | Accumulated editing data | Save work and consider the Purge command |
| External SSD is selected but unavailable | Drive connection or filesystem | Reconnect the drive and verify its format |
| Photoshop becomes slow during editing | Frequent scratch-disk access | Monitor Efficiency and review memory settings |
| Error persists despite adequate free space | Corrupted preferences or configuration | Reset preferences as a last resort |
Check 1: Confirm the available storage again
Check the exact scratch volume, not just the total free storage displayed by your computer. Confirm that the drive has enough available space for the operation.
Check 2: Restart Photoshop
Save your work, quit Photoshop, and reopen it. This allows the application to start a fresh editing session rather than continuing with the previous session's accumulated working data.
Check 3: Verify the external drive
Check that the drive: - Is physically connected. - Appears in the operating system. - Has a supported filesystem. - Is writable. - Has enough available space. - Is not being disconnected during editing.
Check 4: Review Photoshop's current release
Install an available stable update if you are running an outdated version. Check Adobe's current troubleshooting and known-issues documentation before changing system settings or reinstalling the application.
Check 5: Reset Photoshop preferences
Corrupted preferences can affect scratch disk configuration. This should be a last resort because resetting preferences also resets custom application settings. Adobe's documented procedure is: 1. Close Photoshop completely. 2. Hold Shift + Alt + Ctrl while launching Photoshop on Windows. 3. Hold Shift + Option + Command while launching Photoshop on macOS. 4. Select Yes when prompted to delete the Adobe Photoshop Settings file. 5. Reconfigure the scratch disks after launching. 6. Test the affected operation again. Back up important custom preferences, actions, and other settings before resetting them. Source: Adobe – Reset Preferences in Photoshop.
16. How to prevent Photoshop scratch disk errors
The most reliable long-term approach is to manage the computer's available storage and Photoshop's working requirements together. Use the following practices: - Maintain sufficient free storage. Use Adobe's 100 GB recommendation as a starting target for the primary scratch volume, with additional capacity for demanding projects. - Use a suitable SSD. Prefer a fast, directly connected SSD with sufficient capacity and a supported filesystem. - Keep image dimensions appropriate. Avoid creating unnecessarily large canvases when the final output does not require them. - Choose bit depth based on the project. Use 16-bit or 32-bit workflows when the additional precision is required. Do not sacrifice image information merely to resolve a storage warning. - Keep History States appropriate. Use enough undo history for your workflow without retaining substantially more than you need. - Keep recovery enabled. Protect important work against crashes and unexpected shutdowns. - Avoid unnecessary open documents. Close projects after completing them. - Review loaded presets. Back up custom presets and remove resources you do not currently need. - Monitor your storage periodically. Investigate unusually large folders and files before your primary scratch disk becomes nearly full. - Keep backups. Never treat scratch disk cleanup as a replacement for proper project backups.
Final checklist: Fix a full Photoshop scratch disk
Before considering the issue resolved, verify the following: - Photoshop's selected scratch disk has sufficient available space. - The primary scratch volume has been checked, not just the computer's total storage. - Unnecessary files have been removed safely. - Photoshop has been restarted. - Large image dimensions and bit depth have been reviewed. - History States are appropriate for the workload. - Auto-Recovery remains configured to protect important work. - External scratch drives use supported formats. - The external drive remains connected. - Important Photoshop documents and custom settings are backed up.
Final takeaway
A Photoshop scratch disk error is a storage-management problem, but deleting files is not always the complete solution. The underlying cause may be insufficient free space, an incorrectly selected volume, unusually large image dimensions, high bit depth, accumulated editing history, or limited RAM. The best approach is to identify the exact scratch disk, inspect how Photoshop uses memory and temporary storage, free space on the correct volume, and adjust the application only where necessary. Understanding these distinctions can help you resolve the immediate error without unnecessarily deleting important projects, reducing image quality, or disabling useful recovery features.
Sources, Evidence, and Technical References
This article is based primarily on official product documentation and operating-system support resources. The sources below are mapped to the claims they support. Adobe Photoshop documentation: 1. Troubleshoot scratch disk full errors in Photoshop https://helpx.adobe.com/photoshop/desktop/troubleshoot/performance-stability-issues/troubleshoot-scratch-disk-full-errors-in-photoshop.html Supports: The 100 GB free-space recommendation, Windows Photoshop Temp file cleanup, macOS storage cleanup, supported scratch-disk filesystems, History States and Auto-Recovery considerations, resetting preferences to resolve configuration problems. 2. Set up and manage scratch disks https://helpx.adobe.com/photoshop/desktop/troubleshoot/troubleshoot-tools-resources/set-up-and-manage-scratch-disks.html Supports: The definition of a scratch disk, why Photoshop uses temporary storage, scratch disk preferences on Windows and macOS, adding multiple scratch disks, drive-priority configuration. 3. Configure Photoshop performance preferences https://helpx.adobe.com/photoshop/desktop/get-started/settings-and-preferences/configure-photoshop-performance-preferences.html Supports: Memory allocation settings, the default 70% RAM allocation, the 85% allocation caution, History States and their resource requirements, cache settings. 4. Fine-tune Photoshop features for performance https://helpx.adobe.com/photoshop/desktop/troubleshoot/performance-stability-issues/fine-tune-photoshop-features-for-performance.html Supports: The Purge command, Undo, Clipboard, Histories, and Video Cache, the warning that Purge cannot be undone, clipboard resource management. 5. Photoshop performance optimization https://helpx.adobe.com/id_en/photoshop/kb/optimize-photoshop-cc-performance.html Supports: Choosing another scratch disk during startup, the Efficiency indicator, closing unnecessary documents, reducing loaded presets, the additional resource requirements of higher bit depths. 6. Bit depth in Photoshop https://helpx.adobe.com/photoshop/desktop/adjust-color/color-modes/bit-depth-in-photoshop.html Supports: 8-, 16-, and 32-bit/channel image data, color-channel calculations, the relationship between bit depth and image size, the information loss associated with reducing bit depth. 7. Channels in Photoshop https://helpx.adobe.com/photoshop/desktop/adjust-color/hdr-and-channel-manipulation/channels-in-photoshop.html Supports: Additional alpha-channel storage, mask and channel-related storage requirements, Document Sizes in the Photoshop status bar, the distinction between uncompressed document size and saved file size. 8. Prevent file loss in Photoshop https://helpx.adobe.com/photoshop/desktop/troubleshoot/file-format-issues/prevent-file-loss-in-photoshop.html Supports: Automatic recovery, recovery intervals, protecting work during crashes and unexpected shutdowns. 9. Reset preferences in Photoshop https://helpx.adobe.com/photoshop/desktop/get-started/settings-and-preferences/reset-preferences.html Supports: The preference-reset procedure, the launch keyboard shortcuts, backing up custom settings before resetting. Operating-system documentation: 10. Apple – Free Up Storage Space on Mac https://support.apple.com/en-us/102624 Supports: macOS Storage settings, System Data classification, moving large media libraries, Downloads and Trash cleanup, identifying unnecessary applications and files. 11. Microsoft – Free Up Drive Space in Windows https://support.microsoft.com/en-us/windows/experience/storage-filemanagement/free-up-drive-space-in-windows Supports: Windows Cleanup Recommendations, Storage Sense, Disk Cleanup, identifying unnecessary personal files, safe storage-management practices. 12. Microsoft – File System Functionality Comparison https://learn.microsoft.com/en-us/windows/win32/fileio/filesystem-functionality-comparison Supports: Filesystem comparisons, the maximum individual file-size limit for FAT32, the differences between NTFS, exFAT, and FAT32. Product-specific reference: 13. Diskfern – Mac Storage Analyzer and Cleanup Features https://www.diskfern.com/features Supports: Visual storage analysis, treemap and list views, large-file discovery, folder inspection, user-reviewed cleanup.
Startup Shortcut for Scratch Disks
If Photoshop refuses to launch due to full scratch disks, hold Command + Option (macOS) or Ctrl + Alt (Windows) immediately upon launching Photoshop to open the Scratch Disk Preferences dialog and assign an alternate drive.
The Diskfern way
How Diskfern helps
When Photoshop scratch disk errors appear or storage runs low, Diskfern gives you total visibility into what is consuming space on your Mac before you delete.
- Scan your Mac storage to visualize hidden Photoshop temp files and system caches.
- Inspect large dormant media files and caches across internal and external drives.
- Review items in the Collector staging drawer and safely free up disk space.
Finding and reviewing is free. Moving items to the Trash from Diskfern is part of Pro.
Download Diskfern FreeQuestions
How to free up scratch disk space without deleting Photoshop projects?
Start by checking the selected scratch disk. Remove unnecessary downloads, installers, duplicate files, and other personal data from that volume. If appropriate, add an external SSD, reduce unnecessary History States, and close documents that are no longer required. You do not need to delete your original Photoshop projects to resolve every scratch disk issue.
Why does Photoshop say the scratch disk is full when I have free space?
Photoshop may be using a different volume from the one you are checking. It can also run out of usable working space when processing particularly large documents. Verify the selected drive, its filesystem, and its available capacity before investigating other causes.
Can I delete Photoshop temporary files?
Yes, but only when you can identify the files correctly. Adobe specifically recommends removing files beginning with Photoshop Temp in the root of the Windows C: drive when troubleshooting scratch disk errors. Close Photoshop completely before doing so. Do not delete unidentified system files or arbitrary temporary files.
Can I use an external SSD as a Photoshop scratch disk?
Yes. Photoshop supports additional scratch volumes. The drive must use a supported filesystem, remain connected, and provide enough free capacity. Adobe recommends prioritizing the fastest available drive.
Does increasing RAM fix a full scratch disk?
It may reduce how frequently Photoshop needs to use scratch storage, but it does not create more physical disk capacity. A full scratch volume still needs available storage.
Does clearing Photoshop's cache delete my original photos?
The Purge command clears selected working information, including undo history and clipboard data. It is not designed to remove the original image files. However, purged undo and history information cannot be restored, so save your work before using it.
Does changing image resolution free scratch disk space?
Changing print resolution without resampling does not change the pixel dimensions. To reduce the actual pixel count, use an appropriate resampling operation. Be aware that reducing image dimensions can permanently remove image detail.
Is 100 GB enough for Photoshop?
Adobe recommends at least 100 GB of available space on the primary scratch disk when troubleshooting this error. However, a very large document or demanding editing workflow can require more. The actual requirement depends on image dimensions, bit depth, layers, editing operations, and available memory.
Can I use an exFAT external drive on a Mac as a Photoshop scratch disk?
Adobe's current scratch disk documentation lists APFS and Mac OS Extended (Journaled) for macOS. Although exFAT is listed for Windows, it is not included in Adobe's macOS scratch disk format list. Choose a supported format for the operating system using the drive.
Why does Photoshop run slowly even when the scratch disk is not full?
Photoshop can access the scratch disk before it reaches a full-disk error. A low Efficiency reading can indicate that Photoshop is relying on scratch storage because its allocated RAM is insufficient for the workload. Check memory allocation, document complexity, and other running applications.

Written by
Diskfern Team
We explain Mac storage using product behavior and the sources listed below. Review your app settings and backups before removing data.
Sources
- Adobe: Troubleshoot scratch disk full errors in Photoshop · checked November 14, 2026
- Adobe: Set up and manage scratch disks · checked November 14, 2026
- Adobe: Configure Photoshop performance preferences · checked November 14, 2026
- Adobe: Fine-tune Photoshop features for performance · checked November 14, 2026
- Adobe: Optimize Photoshop performance · checked November 14, 2026
- Adobe: Bit depth in Photoshop · checked November 14, 2026
- Adobe: Channels in Photoshop · checked November 14, 2026
- Adobe: Prevent file loss in Photoshop · checked November 14, 2026
- Adobe: Reset preferences in Photoshop · checked November 14, 2026
- Apple: Free up storage space on Mac · checked November 14, 2026
- Microsoft: Free up drive space in Windows · checked November 14, 2026
- Microsoft: File system functionality comparison · checked November 14, 2026
- Diskfern: Mac storage analyzer and cleanup features · checked November 14, 2026
Keep reading
Explore practical storage guides for Apple Mail and macOS applications.
Why Is Adobe After Effects Filling Your Mac's SSD With Cache Files?
After Effects cache can consume hundreds of GB on your Mac. Find disk and media cache files, clear them safely, set limits, and move cache to an external SSD.
SSD NVMe on a Mac: Choosing an External Enclosure
Learn how to use an SSD NVMe with your Mac. Compare external enclosures, USB4 speeds, compatibility, APFS and exFAT formats, and setup.
Lexar NM790 2TB NVMe SSD: Specifications, Performance, PS5 Compatibility, and Buying Guide
The Lexar NM790 2TB is a PCIe 4.0 SSD with up to 7,400 MB/s read speeds, 1,500 TBW endurance, and HMB 3.0. Explore specs, PS5 compatibility, cache behavior, and buying guidance.
What Is System Data on Mac? (And How to See What's Inside It)
System Data is not one folder. See what it contains (caches, snapshots, logs, app data), why it grows, and which parts are safe to delete.

Get your space back. Start with a free scan.
Explore the files and folders Diskfern can read. Your files stay on your Mac, and nothing is removed until you say so.
macOS 14 Sonoma or later · Apple silicon and Intel