System Data & macOS
Why Can't I Install a macOS Update Even Though I've Freed Up Enough Space?
You delete old downloads, remove applications, empty the Trash, and finally free up several gigabytes on your Mac. You return to Software Update, expecting the update to install. Instead, macOS shows the same message: There is not enough free space to install this update.
 Diskfern Team9 min readUpdated
Short answer
A macOS update often fails after deleting files because the installer needs additional working space beyond the download size to prepare, unpack, and verify files. Furthermore, reported available storage often includes purgeable space that cannot be immediately claimed. Check your actual free space with df -h, restart, or use Safe Mode to clear temporary caches before retrying.
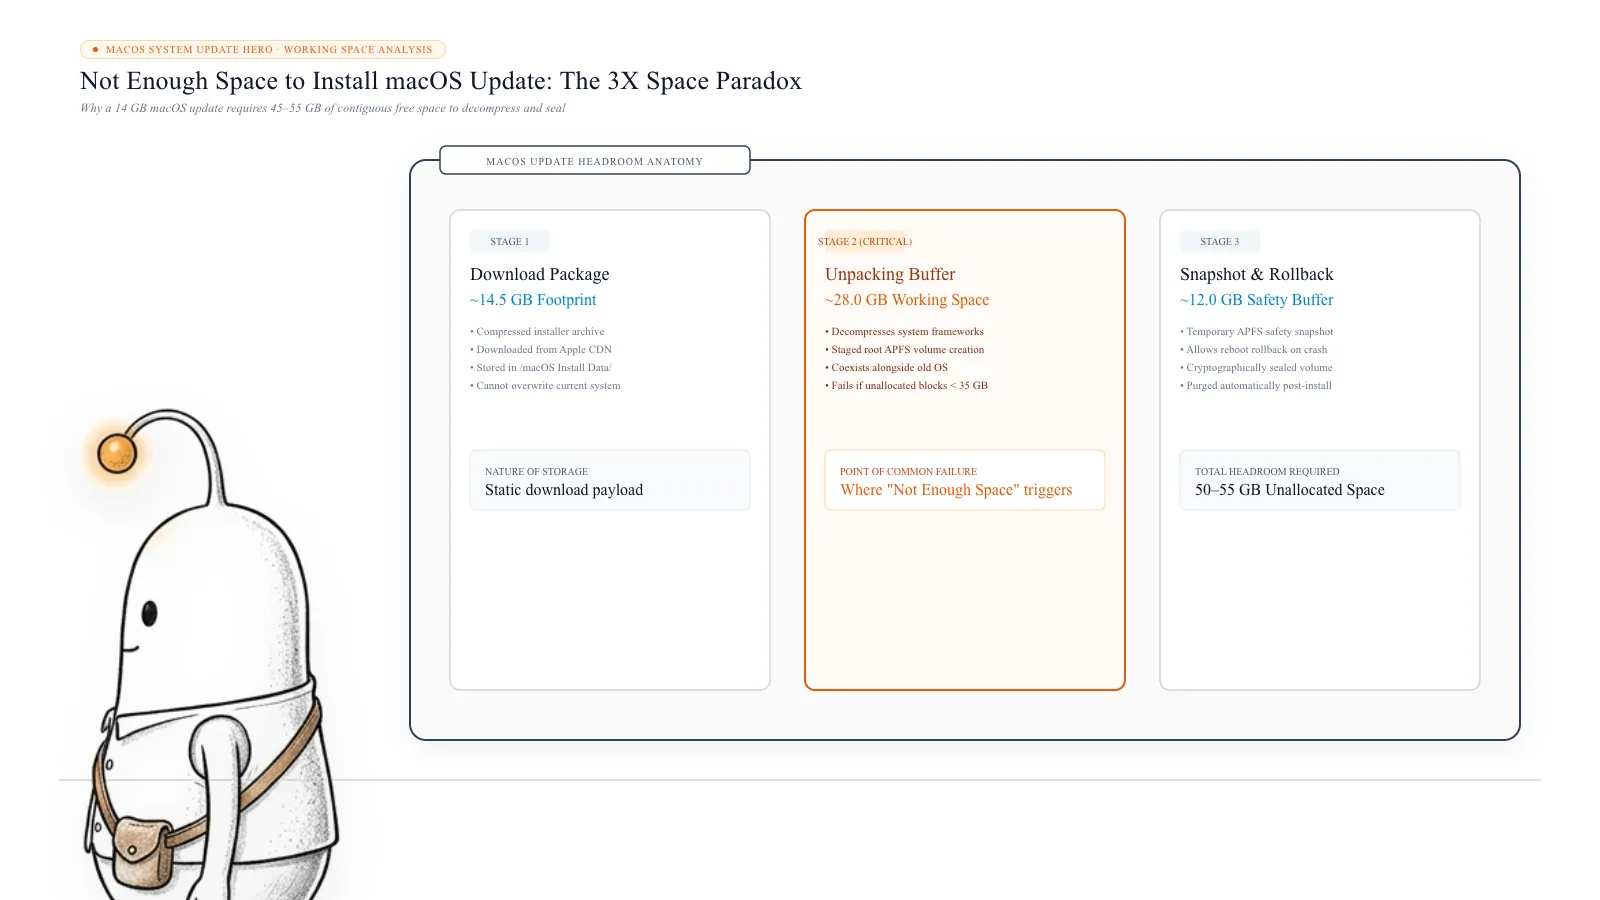
Why does macOS need more space than the update download?
When you check Software Update, you may see an update download size of several gigabytes. It is easy to assume that freeing slightly more than that amount will be enough. However, downloading an update is only one part of the process.
During installation, macOS may need space for:
- Downloaded update packages.
- Temporary installation and preparation files.
- Unpacked or expanded installation data.
- Additional system resources required during the upgrade.
- Temporary space while existing system components are replaced.
The exact requirement depends on your Mac, its current macOS version, the update, and the installation method. This is why an update that appears to be 10 GB in size may require considerably more free storage to complete.
Important: There is no single free-space requirement that applies to every macOS update. Follow the requirement shown by Software Update or the installer rather than relying on a fixed number found in an online guide.
Read more: Apple Support: If an error occurs while updating or installing macOS
1. Available storage is not always the same as immediately free storage
One possible reason for the error is the difference between available and purgeable storage. macOS can identify certain files and data that it may remove when additional space is needed. This is called purgeable storage.
Depending on the storage view, purgeable space may be included in the amount reported as available. However, an installation process may not be able to use all of that space immediately.
| Storage category | Example |
|---|---|
| Immediately free space | 12 GB |
| Purgeable space | 20 GB |
| Reported available space | 32 GB |
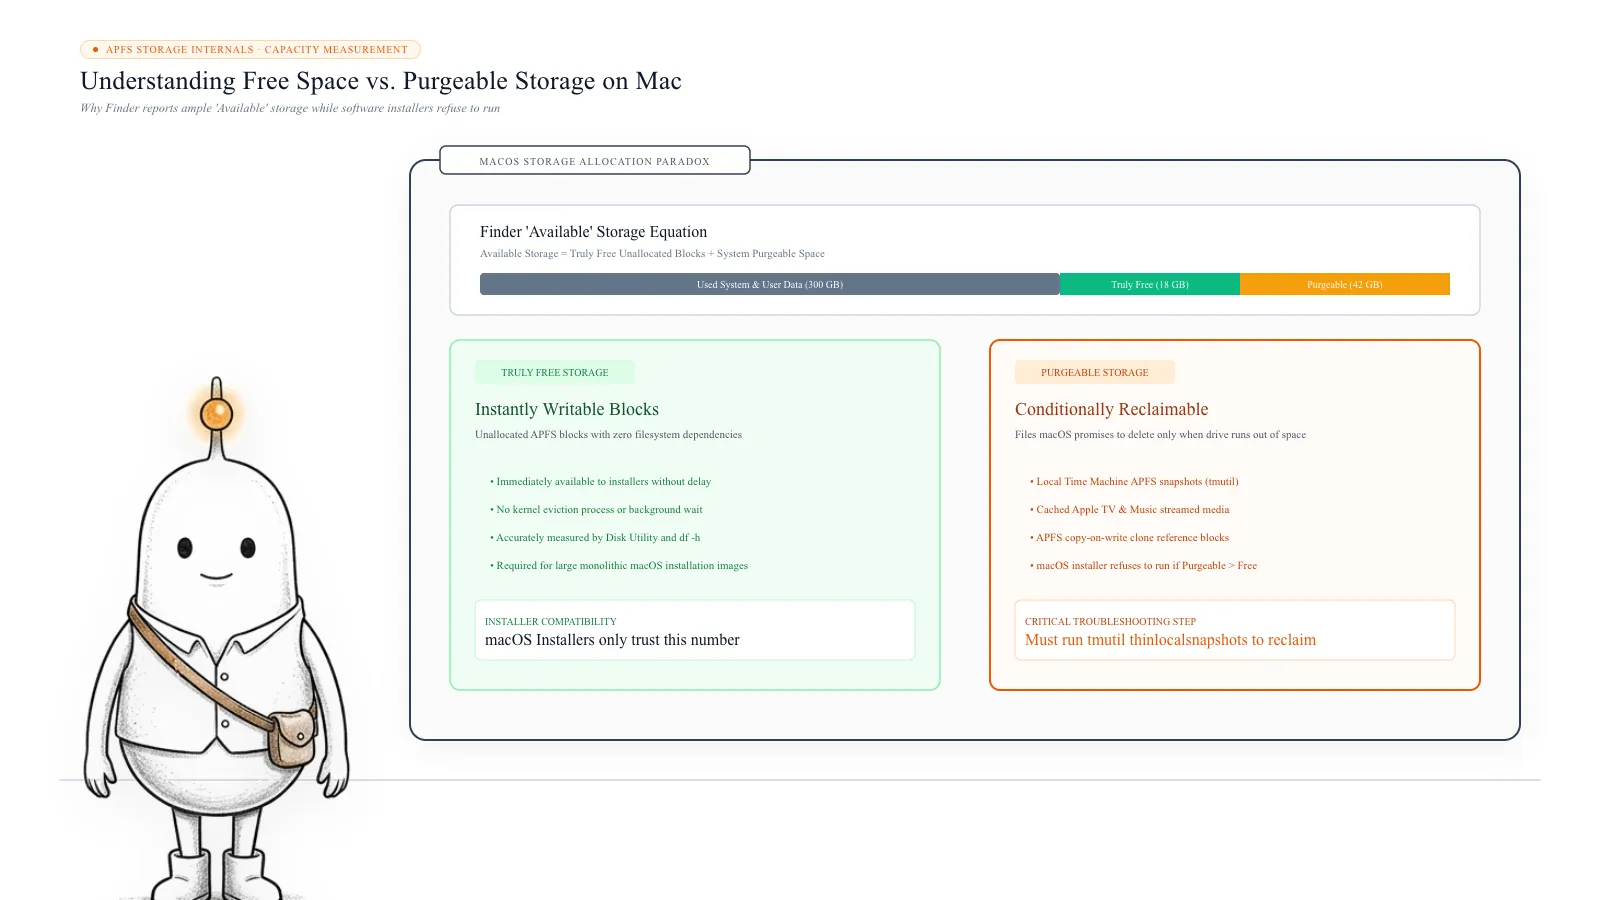
These are illustrative numbers, not a guaranteed representation of how every macOS version reports storage. If an installer needs more than the immediately available space, the update may fail even though the storage overview appears to show enough room.
How to check your available storage: Open the Apple menu > System Settings > General > Storage. Wait for the storage categories to finish calculating. Check the reported available space and identify which categories are consuming the most storage.
You can also open Terminal and run:
df -h /Look at the Avail column. This gives you a filesystem-level view of available space on the startup volume. It is useful for comparing storage before and after cleanup, but it does not guarantee that the macOS installer will accept that amount. Do not assume that Finder, Storage settings, and Terminal will always display identical figures. They may account for storage differently.
Read more: Apple Support: Free up storage space on Mac
2. Temporary update files can consume additional storage
macOS does not simply download an update and immediately replace the operating system. It also prepares the installation environment. Depending on the update and installation stage, temporary files and downloaded update assets may occupy additional storage.
This can make the storage situation confusing:
- You download an update.
- macOS begins preparing the installation.
- Additional temporary data is created.
- The installer discovers that it needs more working space.
- Installation stops because the required space is unavailable.
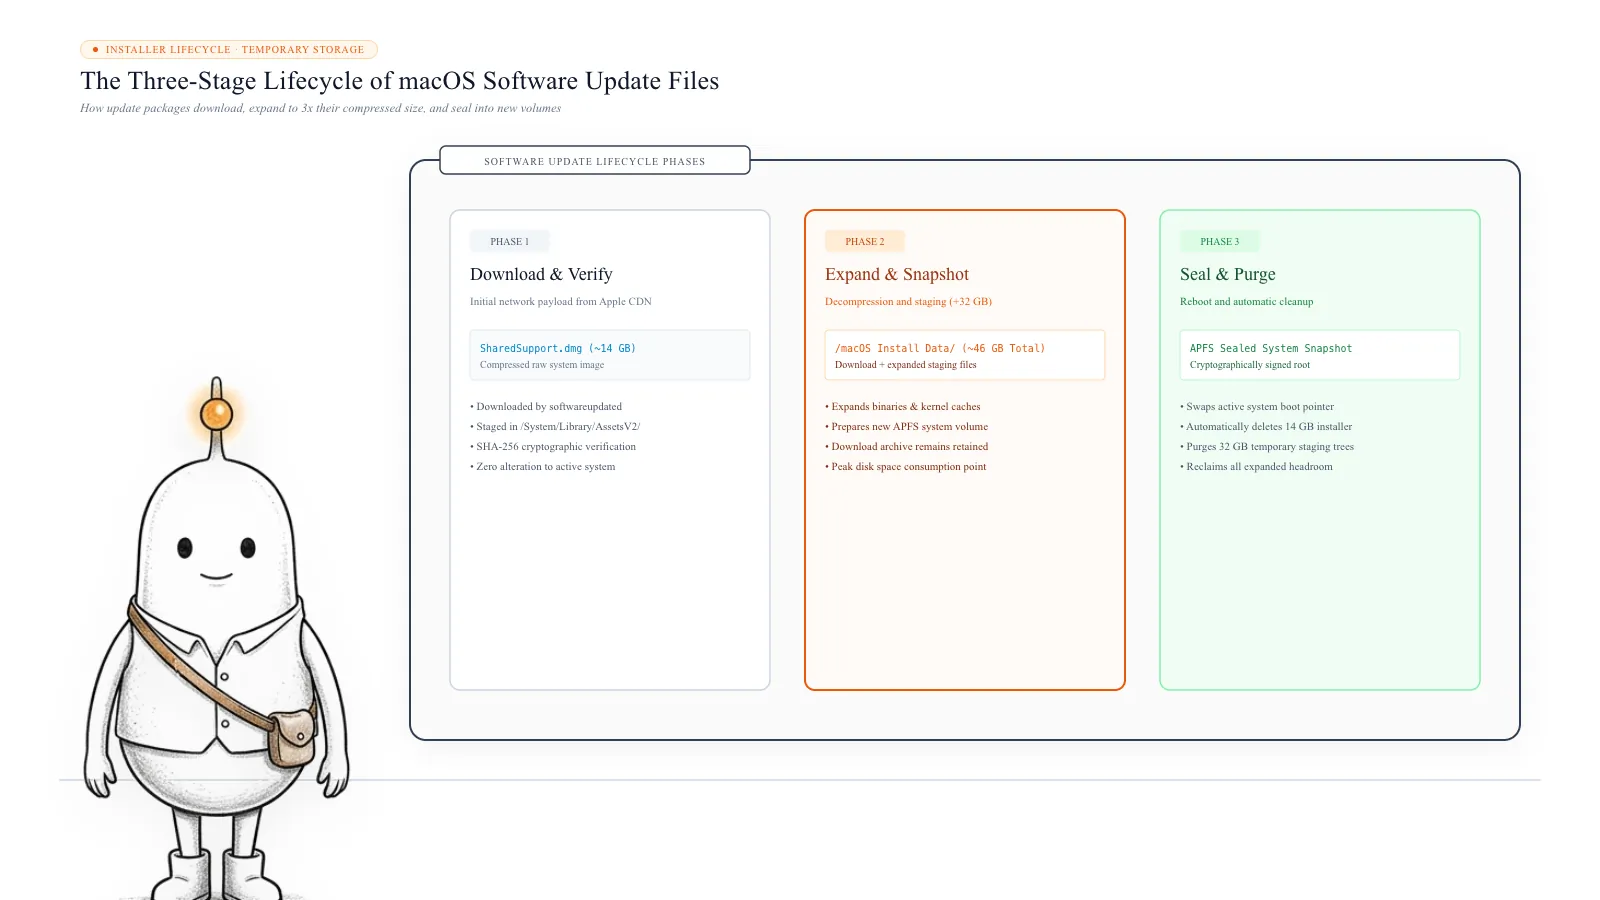
In some cases, a failed or interrupted update attempt may leave downloaded or staged data that needs to be handled by macOS. This is one reason your available storage may change between installation attempts.
Should you manually delete macOS update files? You may find online instructions recommending that you remove files from system directories such as /Library/Updates/ or /private/var/. Avoid deleting files from these locations simply because they look related to an update. macOS manages system update components and temporary installation data. Removing the wrong files can create additional installation problems. Start with a restart and Apple's recommended storage-management steps instead.
Read more: Apple Support: If an error occurs while updating or installing macOS
3. Time Machine snapshots may affect available storage
If you use Time Machine, your Mac may keep local snapshots on its internal storage. These snapshots allow macOS to retain earlier versions of files between backups. They can occupy storage even when you are not actively running a backup.
macOS generally manages local snapshots automatically and can remove them when space is needed. However, their presence can make storage usage harder to understand.
Check for local snapshots: Open Terminal and run:
tmutil listlocalsnapshots /If snapshots exist, Terminal will display their identifiers, for example: com.apple.TimeMachine.2026-10-20-120000.local com.apple.TimeMachine.2026-10-21-120000.local. The dates above are illustrative.
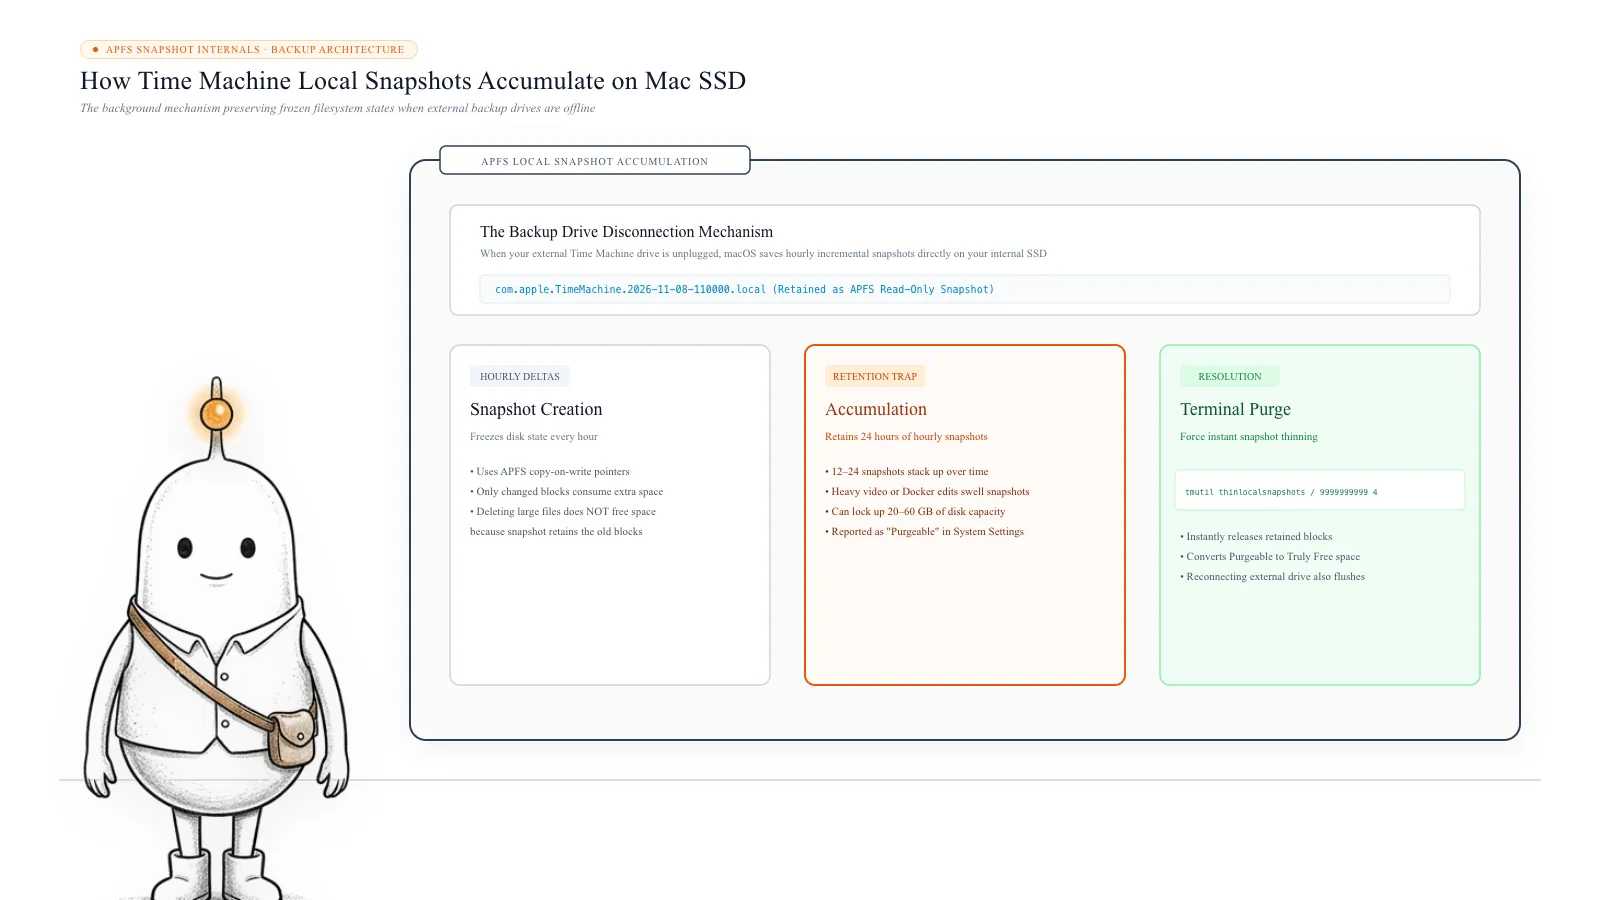
Seeing snapshots does not automatically mean they are causing your update failure. It simply gives you another place to investigate when storage figures do not make sense. Do not delete snapshots blindly. macOS normally manages them, and removing them is not the first troubleshooting step.
Read more: Apple Support: About Time Machine local snapshots
4. Restart your Mac before trying the update again
A restart is a simple step, but it can help when storage figures are affected by temporary activity. It closes running applications and processes, releases some temporary resources, and gives macOS an opportunity to recalculate storage usage.
- Save your work.
- Restart your Mac.
- Wait for macOS to finish starting.
- Open System Settings.
- Go to General > Storage.
- Check the available space again.
- Return to Software Update and retry.
If the update still fails, continue with the next steps rather than repeatedly downloading it.
5. Use Safe Mode to temporarily free storage
Apple recommends trying Safe Mode when you need to temporarily make more storage available. Safe Mode clears certain system caches, which macOS can recreate when needed. This may provide enough additional space for an operation such as installing an update.
Apple silicon Mac: Shut down your Mac. Press and hold the power button until startup options appear. Select your startup disk. Hold the Shift key. Select Continue in Safe Mode.
Intel-based Mac: Shut down your Mac. Turn it on. Immediately press and hold the Shift key. Release it when the login window appears.
After starting in Safe Mode: Log in, check your available storage, and try installing the update if enough space is available. When you finish, restart normally to leave Safe Mode. Safe Mode does not guarantee that an update will install. It is simply one of Apple's recommended ways to temporarily make more storage available.
Read more: Apple Support: Use safe mode on your Mac
6. Find large files that are actually consuming your storage
If you have already deleted several files but the update still fails, deleting more random files is unlikely to be a good strategy. First, identify what is taking up space.
Open System Settings > General > Storage. Review categories such as Applications, Documents, Downloads, iOS Files, Messages, and System Data. Pay particular attention to large files and old data that you no longer need. For example, developers may have storage consumed by Xcode build data, simulators, Docker images, virtual machines, or local AI models.
You can also use Terminal to inspect the size of your home folder:
du -sh ~/*To inspect Library folders:
du -sh ~/Library/*These commands can help identify large directories. Some folders may require additional permissions, and the results will not necessarily account for every APFS snapshot or protected system area. Only remove files you understand and no longer need. Move important files to an external drive only after confirming that the copy is complete and that you have a backup.
Find storage-consuming files with Diskfern: When macOS groups a large amount of data under broad categories such as System Data, it can be difficult to understand where the space is actually going. Diskfern helps you investigate storage through Treemap, Sunburst, and List views. You can explore large files and folders, inspect developer-related storage, and identify potential cleanup candidates without relying entirely on macOS category estimates. Start with a scan and investigate the largest items before deciding what to remove.
7. Try installing the update separately from other updates
If you are installing a macOS upgrade alongside Safari or other available software updates, try handling them separately. Install the macOS update on its own first, then install the remaining updates afterward.
This is not a universal fix, but some Mac owners have reported that separating updates resolved their installation problem. If Software Update continues to fail, Apple also recommends trying macOS Recovery. Installing from Recovery can help ensure that other software running on your Mac is not interfering with the installation.
Read more: Apple Support: If an error occurs while updating or installing macOS
8. What if the update still says there is not enough space?
If you have checked storage, restarted, tried Safe Mode, and removed unnecessary files, but the same error remains, investigate whether the problem is actually related to storage.
- Internet connection: The installer needs a stable connection to download macOS and obtain information specific to your Mac.
- Startup disk: Confirm that you are installing to the intended startup disk.
- Disk health: Use Disk Utility from macOS Recovery to check and repair the startup disk when appropriate.
- Installation method: Try installing from macOS Recovery if Software Update continues to fail.
- Firmware issues: Persistent installation problems on some Apple silicon and T2-equipped Macs may require additional Apple Support assistance.
Avoid erasing your Mac or reinstalling macOS as an early troubleshooting step. Back up important files before attempting major recovery or disk operations.
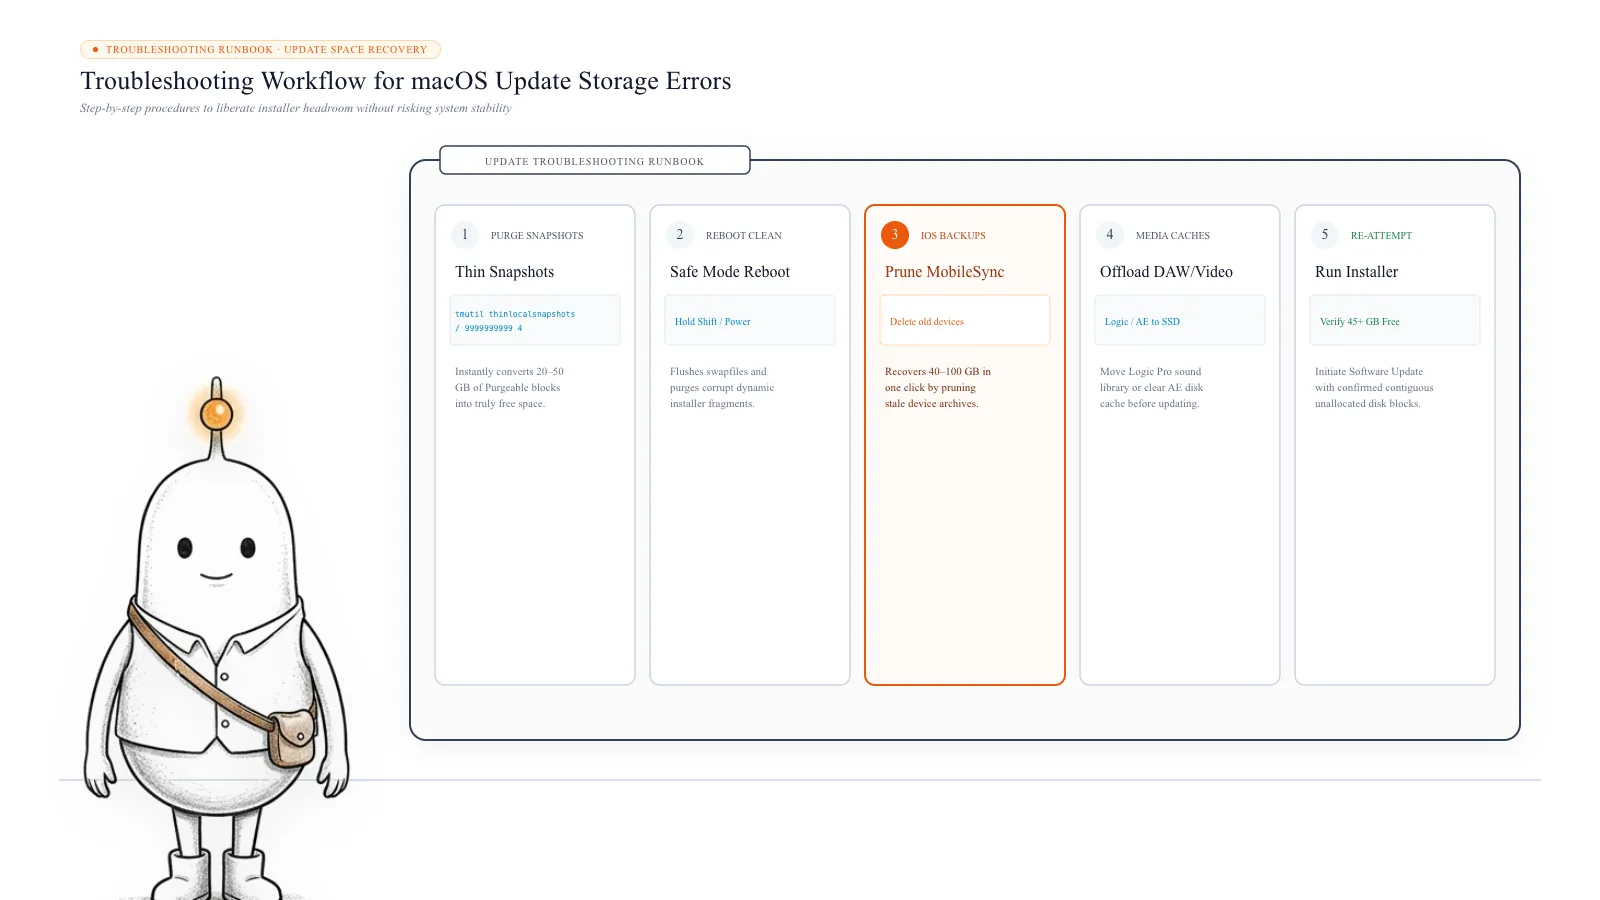
Read more: Apple Support: If an error occurs while updating or installing macOS
How much free space should you keep before updating macOS?
There is no universal number that works for every Mac. A small security update and a major macOS upgrade can have very different storage requirements. The amount of space needed also depends on the current macOS version and the installation process.
Use these guidelines:
- Check the specific requirement displayed by the installer.
- Keep additional working space beyond the displayed download size.
- Do not count entirely on purgeable storage being released immediately.
- Remove large files you can safely replace or restore.
- Avoid starting an upgrade when your startup disk is almost full.
If you regularly run into storage problems, consider keeping more free space available between updates instead of waiting until macOS refuses to install one.
What’s safe to delete?
Identified User Downloads
Safe~/Downloads/*
Removes installer disk images and media you already installed or backed up.
How: Delete completed DMG installers or move archives to an external drive.
User Application Caches
Review first~/Library/Caches/*
Apps rebuild them as needed; active sessions may reload slower on next open.
How: Safe Mode clears system caches; inspect individual large app caches before removing.
Time Machine Local Snapshots
System-managedAPFS local snapshots
macOS thins local snapshots automatically as space is requested.
How: Check with tmutil listlocalsnapshots /; do not purge prematurely.
System Update Staging Folders
Don't touch/Library/Updates/ or /private/var/
Can corrupt the macOS update package and create further installer errors.
How: Let macOS manage update files automatically; restart instead of manual deletion.
Never manually delete /Library/Updates/ or /private/var/
Online guides sometimes recommend deleting update staging directories directly. Doing so can corrupt active installation receipts or leave the installer in an unrecoverable state. Use a clean restart or Safe Mode instead.
Download size does not equal install size
macOS updates require significant working space to download packages, expand archives, verify cryptographic signatures, and replace system components before reclaiming space.
Do it manually
No app needed. These steps use Finder, Terminal, and each tool’s own settings.
- 1
Check true filesystem-level available space on your startup disk.
$df -h /Review the Avail column to see immediately available unreserved storage.
- 2
Inspect whether local Time Machine snapshots are occupying disk space.
$tmutil listlocalsnapshots /Snapshots count as purgeable storage and are automatically managed by macOS.
- 3
Measure large directories in your home folder without modifying files.
$du -sh ~/*Identify whether Downloads, Documents, or Library are using the most space.
- 4
Restart your Mac to release temporary file locks and update storage accounting.
Closes background processes and recalculates available disk space.
- 5
Boot into Safe Mode if additional temporary space is required.
Safe Mode clears system kernel caches and checks the startup directory structure.
The Diskfern way
How Diskfern helps
When macOS groups disk usage under broad System Data categories, Diskfern visually surfaces what is taking up space through Treemap, Sunburst, and List views.
- Open Diskfern and scan your Macintosh HD or Home folder in seconds.
- Browse the interactive Treemap to immediately spot large dormant downloads and build caches.
- Check Smart Highlights to separate rebuildable caches from personal files.
- Stage candidate items in Collector to review safety classifications before moving anything to Trash.
Finding and reviewing is free. Moving items to the Trash from Diskfern is part of Pro.
Download Free for macOSQuestions
Why does my Mac say there is not enough space when I have 30 GB free?
The installer may need more working space than the update's download size. Also, the storage figure you see may include purgeable space that is not immediately available to the installer. Check Storage settings and compare the filesystem's available space using df -h /.
Does a macOS update need twice its download size?
Not always. The amount of additional working space depends on the update, your current macOS version, and the installation method. There is no universal rule that every update needs exactly twice its download size.
Can I delete files from the Library folder to make room?
You can remove certain user data and application caches when you understand what they contain. However, do not randomly delete files from system Library folders or update-related directories. Start by identifying large files and using macOS storage-management recommendations.
Does Safe Mode really free up storage?
It can. Apple explains that Safe Mode clears certain system caches, which may temporarily make enough room for an operation such as installing an update. The amount of space recovered varies.
Can Time Machine snapshots prevent a macOS update?
Snapshots can contribute to storage usage, but their presence does not automatically mean they are responsible for an update failure. macOS generally manages local snapshots automatically. Check them as part of your investigation rather than deleting them without a reason.
Should I reinstall macOS if the update keeps failing?
Not immediately. First check available storage, restart, try Safe Mode, and investigate other installation errors. If the issue persists, follow Apple's Recovery and disk-repair guidance. Always back up your data before attempting major recovery steps.

Written by
Diskfern Team
We explain Mac storage using product behavior and the sources listed below. Review your app settings and backups before removing data.
Sources
- Apple Support: Free up storage space on Mac · checked November 8, 2026
- Apple Support: If an error occurs while updating or installing macOS · checked November 8, 2026
- Apple Support: About Time Machine local snapshots · checked November 8, 2026
- Apple Support: Use safe mode on your Mac · checked November 8, 2026
Keep reading
Continue exploring macOS system storage, safety principles, and triage.
Why Does My Mac Keep Losing Storage Automatically?
Find out why your Mac loses storage even when you're not downloading anything: swap files, app caches, background logs, and how to safely diagnose the cause.
Deleted Files but Mac Storage Still Full?
Deleted files but Mac storage is still full? Understand the Trash, APFS snapshots, purgeable space and shared volumes before deleting anything else.
Is This Mac File Safe to Delete?
Found a huge file or folder on your Mac? Check who owns it, whether it can be rebuilt, and what deleting it affects before you reclaim space.
Smart Highlights Safety Tiers
Turn a wall of folders into useful categories with clear Safe, Review first, and Protected guidance.

Get your space back. Start with a free scan.
Explore the files and folders Diskfern can read. Your files stay on your Mac, and nothing is removed until you say so.
macOS 14 Sonoma or later · Apple silicon and Intel